
I MAKE TREES
Here are 3 Easy, Fun Grafts I Made Yesterday
Finally, the weather cooperated and I got around to doing some grafting. I could have done it a couple of weeks ago, as I had planned, but I’m blaming cooler weather for the delay. Not that I couldn’t have done it back then, but things chug along more quickly in warmer weather, so I waited.
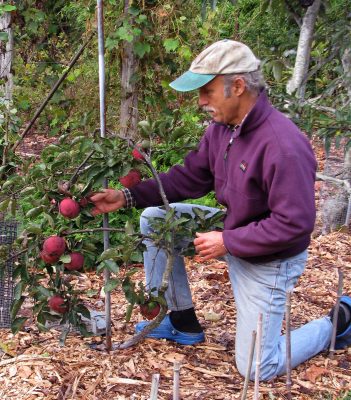
Apple tree on very dwarfing rootstock
I’m going to describe 3 easy grafts I did yesterday. Which one I chose to do depended on the size of the rootstock on which I was grafting. The scions, which are the varieties I’m grafting on the rootstocks, are all one-year-old stems 6 to 12 inches long and more or less pencil-thick (remember what pencils are?). They have been stored, wrapped to prevent drying out, in the refrigerator so that they are more asleep than the awakening rootstocks.
The principles that make any graft work are all the same. Close kinship of stock and scion. Close proximity of the cambium — the layer just beneath the bark — of the stock and of the scion. All open wounds sealed against moisture loss. And immobilization of rootstock and scion until graft succeeds. My book, The Ever Curious Gardener: Using a Little Natural Science for a Much Better Garden, goes into more detail about the why and the how of grafting.
A Tree Make Over
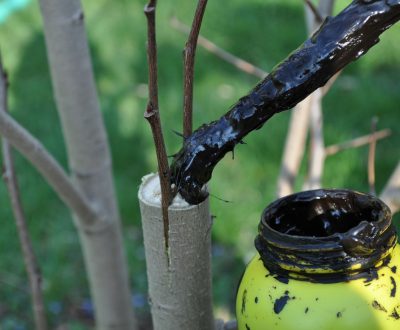
For starters, I turned to the bark graft, good for grafting on rootstocks a couple or more inches across. This first graft was on a Tyson pear tree whose flavor wasn’t up to snuff, so that graft began with doing a Henry the Eighth, lopping off the tree’s head to graft height, which was a couple feet from ground level.
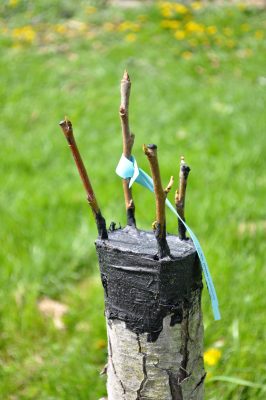
The bark graft comes with an good insurance policy. That’s because onto each rootstock, depending on its diameter, I can stick 3, 4, 5, or even more scions. Only one scion needs to grow, but the more that are grafted, the greater the chance of at least one growing.
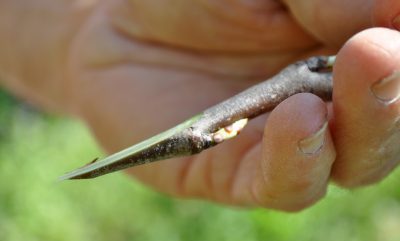
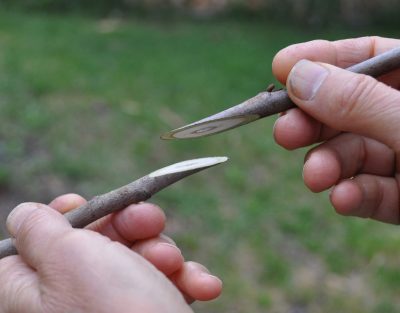
I prepared a scion with a bevel cut 2 inches long, at its base, not quite all the way across from one side to the other. On the opposite side of the cut, I nicked off a short bevel.
Then, into the freshly cut stub on the rootstock, I made two vertical slits through the bark, each about 2 inches long and as far apart as the width of the base of the scion.
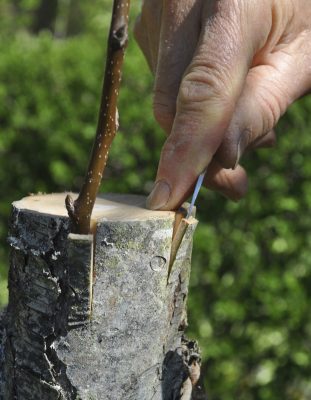
Carefully peeling back the flap of bark welcomed in the long, cut surface of the scion, putting the cambial layers of rootstock and scion in close contact. This was repeated with the other scions, all around the stub. With the peeled back flaps of bark from the rootstock pushed back up against each inserted scion, one or two staples from a staple gun or a tight wrapping with stretchy electrician’s tape sufficed to hold everything in place.
Finally, I sealed all cut surfaces against moisture loss, for which there are a number of home-made and commercial products. My favorite is a commercial product called Tree-Kote, a black goo that works really well and absorbs sunlight.
Another Tree Make Over, For Smaller Trunks
For smaller rootstocks, say 3/4 inch up to a couple of inches across, there’s the cleft graft. This also comes with an insurance policy, though not as good as that of the bark graft because it only gets two scions per graft. Still, it’s easy so chances for success are high.
At the base of each of the two scions, I made two bevel cuts less than halfway through, each two inches long and not exactly on opposite sides. Viewed head on and from below, the uncut portion was slightly wedge-shaped.
Turning to the rootstock, an older rootstock (OH x F 87), I lopped it off squarely, with a saw, then created a split a couple of inches deep in the middle of the cut surface by hammering a heavy, sharp knife right down into it. After removing the knife, a screwdriver pushed down into the split separated it enough to insert the two prepared scions at each edge of the cleft with their cambiums aligned with the cambium of the rootstock.
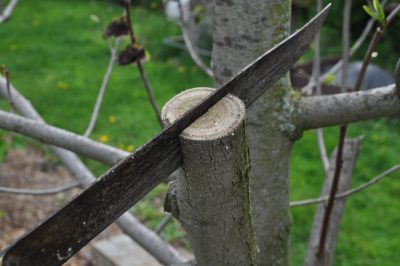
Pulling out the screwdriver caused the springiness of the rootstock to close the cleft and hold the scions securely in place. As with the bark graft, all cut surfaces got smeared with Tree-Kote.
And Some Baby Tree Grafts
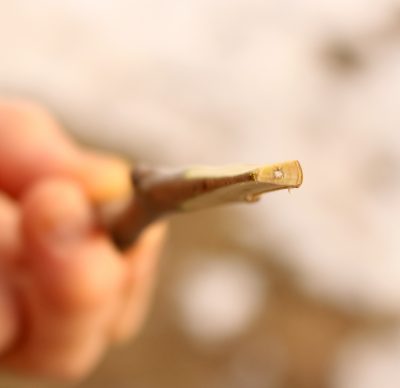
The whip graft is my graft of choice when rootstock and scion are about the same thickness, pencil-thick. Rootstocks for whip grafts were again OH x F87 pears, this time one-year-old rootstocks, pencil-thick.
I cut at the bottom of the scion with a smooth, sloping cut an inch to an inch and a half long, and made a similar cut at the top of the rootstock.
Holding the sloping cuts against each other and aligning just one edge of each if their diameters didn’t exactly match, I bound rootstock and scion together with a rubber grafting strip. (I’ve also used thick rubber bands, sliced open.)
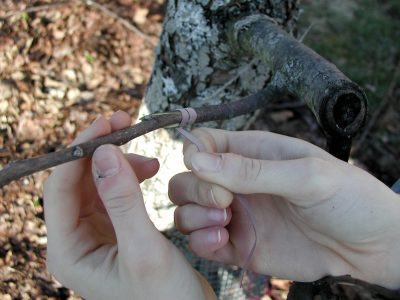
Wrapping whip graft
As with any graft, cut surfaces must be sealed against moisture loss. Parafilm® helps holds the graft together and seals in moisture. Once my whip graft scions are growing strongly, I’ll cut a vertical slit into the binding to prevent it from choking the plant.
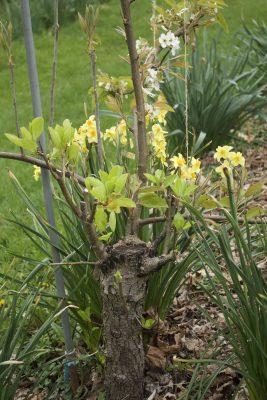
Bark graft, season 3, note flowering
There you have it: 3 easy grafts to make new trees or make over an older tree. Now the excitement begins, watching and waiting for new growth. Sometimes, with that large root system fueling growth, a bark graft scion will grow 2 or 3 feet its first season!

There’s a special place in Paradise for folks who can describe so clearly in writing these kinds of procedures. Really interesting. Much appreciated, Lee.
And what a cold spring we’ve had – and it could “sublime” directly into summer and 80- degree weather – it has happened before –
Glad you liked my writing. It’s grueling.
Do you know whether Callery/Bradford pear roots would make a reasonable rootstock for fruiting pear grafts? I was house hunting recently in a neighborhood that was clearly built when these trees were all the rage, and saw many houses with them in the front and back yards. I hate the smell of those trees, and it would be great to know if the mature roots and trunk would be a good match for fruiting pears, as that would probably give scions a great head start above starting from a young nursery rootstock.
Also, given what you have said about the long wait for Shipova to fruit, could those also be brought into quicker bearing with a graft onto a Bradford pear (or even a different mature fruiting pear rootstock)?
I have grafted pears on Callery/Bradford per rootstocks. The resulting trees would, I think, be about full-size. Shipova probably would bear sooner on some rootstocks, not Callery/Bradford, but one of the many that bring on early bearing, especially the super dwarfing P233. Perhaps quince also.
I notice that all of your grafts above were made directly to the rootstock (or at least that is how it sounds). If you had a tree that you wanted to add a new variety to without getting rid of the existing grafted variety (say for pollination purposes or to extend a harvest season without room for a new plant) would it be more advisable to graft to the rootstock directly or to one of the varietal branches, or is there a negligible difference?
Definitely graft onto one of the varietal branches. If you cut back the top to graft onto the rootstock, nothing will be left of the previous variety that was grafted on it. That is, unless growing off the rootstock there’s a side branch on which you graft the new variety. For my grafts, I cut the tree back to the rootstock because I no longer wanted the variety that was grafted on it.