
My Compost for a Bin
Compost, All Good, In Time
One problem with gardening, as I see it, is that much of it is about delayed gratification. Even a radish makes you wait 3 weeks after sowing the seed before you get to chomp on it. With a pear tree, that wait is a few years.
Which brings me to compost. Now that the flurry of spring pruning and planting have subsided, I’m starting this year’s compost cycle again — that’s compost for use next year. Delayed gratification again.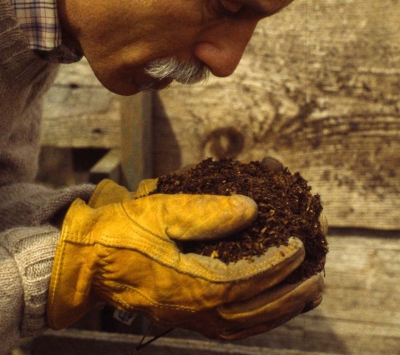
Food waste, yard waste, and compostable paper make up 31% of an average household’s waste which, if landfilled, ties up land and contributes to global warming. Composted, it feeds the soil life and, in turn, plants, and maintains soil tilth, that crumbly feel of a soil that holds on to moisture yet has plenty of space for air. You don’t get all this from a bag of 10-10-10 fertilizer or even a bag of any concentrated organic fertilizer.
The key to good composting is to have a good bin. Any pile of old vegetables, leaves, grass clippings, old cotton clothes, straw, or wood chips will turn to compost eventually. A bin keeps everything neat, fends off scavengers, and maintains heat and moisture within.
Buying a compost bin is one option. Consider whether you’re making compost for your garden or just as an environmentally sound way to recycle what used to be called “trash.” You need a larger bin for the former use because you’ll be importing materials, such as leaves, wood chips, and manure, to bulk up the compost.
The Perfect Compost Bin?
Over the years, my home made compost bins have gone through several incarnations. Four wooden panels filled in with chickenwire made my first bin. Once a pile was made and settled a little, I removed the panels, pinned black plastic onto the compost cubes to keep in moisture, and set up the panel in the next location for a new “compost cube.” The next bins weren’t bins but just carefully stacked layers of ingredients, mostly horse manure, hay, and garden and kitchen gleanings. And then there was my three-sided bin made of slabwood.
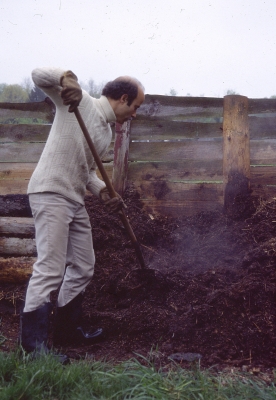
A dramatic jump in functionality came with my bin made from 1 x 12 hemlock boards from a sawmill, notched to stack together on edge like Lincoln logs. The only problem with this system was that I had to periodically purchase and notch new boards as older ones rotted away.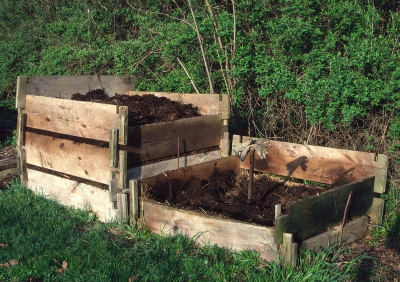 Which brings me to my current bin which, now, after many years of use, I consider nearly perfect. Instead of hemlock boards, these bins are made from “composite lumber.” Manufactured mostly from recycled materials, such as scrap wood, sawdust, and old plastic bags, composite lumber is used for decking so should last a long, long time.
The boards I used were 5-1/2 inches wide and 1 inch thick. A couple of inches from either end of each 5-foot-long board, I cut a notch on each side to a depth one-quarter the width of the board and about 1/8” wider than the their thickness.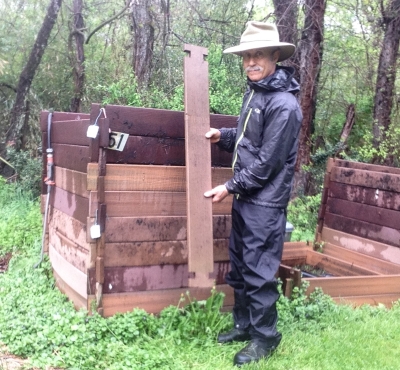 When finished, I ripped one board of the bin full length down its center to provide two bottom boards so that the bottom edges of all 4 sides of the bin would sit right against on the ground.
 Before setting up a bin, I lay 1/2” hardware cloth on the ground to help keep at bay rodents that might try to crawl in from below.
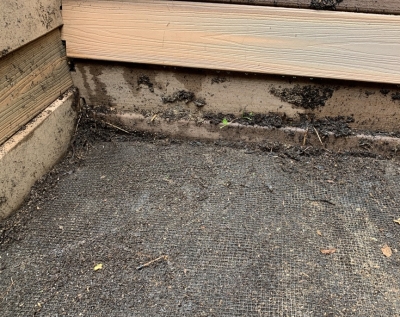 With the Lincoln-log style design, the bin need be only as high as the material within while the pile is being built, and then “unbuilt” gradually as I removed the finished compost.
June 2024 update: As you might note from the photos in this post, I made lots of compost bins, actually too many. What was I thinking? I’ve now decided to sell off some of these bins. About 28 boards, each 4′ long, are needed for a completed bin. I’m selling each board for $5, so a complete bin of 28 boards would cost you $140, more or less, depending on the bin height you want. I do make lots of compost so only have a few bins to sell. Contact me if you’re interested (845-616-0710 or through my website, but not Messenger).
Feed the Beast(s)
Okay, time to feed my compost “pets.” Nothing fancy, just any spent plant from the garden, kitchen trimmings, old clothes made from natural materials, hay scythed from my meadow, horse manure from a local stable, and occasional sprinklings of soil and powdered limestone.
For interest, I’ll sometimes throw old shoes or gloves into a pile to see what’s left once the organic portion of the shoe or glove has been stripped off.By paying attention to the textures of the materials as I add them to the pile, it generally stays well aerated. If I have a load of manure and will be building up many layers of the pile at once, I water the layers as I go; it takes too long to get sufficient water down into the pile after it has been built. Once a pile is completed, I cover it with a layer of EPDM rubber roofing material, cut to fit, to seal in moisture and keep out rain.
Piles built this summer get turned once next spring so I can monitor progress and make sure they’re moist — but not too wet — throughout. The compost is used throughout next year’s growing season.
So yes, there is delayed gratification before I get to use the “black gold.” Then again, making compost is enjoyable; I get some exercise and enjoy feeding the various fungi, bacteria, and other microorganisms at work in the compost pile.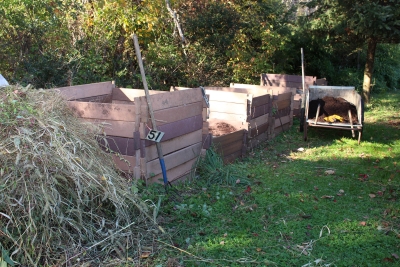


Lee, per usual you’ve left me feeling very grateful for what you’ve shared.
I’ve been telling my clients that “composting isn’t easy,” contrary to popular knowledge. What IS easy is piling up kitchen refuse, trimmings, and brush, which eventually will turn to compost, but without a notable increase in temperature, resulting in a product that carries the same insect pests, fungal diseases, and weed seeds that may have gone into it. So my question – when you use your method (to paraphrase: layering, focus on initial moisture content, preservation of moisture, and a single turning and perhaps moisture adjustment after a year), do you get a product that is free of those contaminants? I think I’m asking in other words, does the compost heat up to over 130 degrees F for a number of days to eliminate those things?
Thanks very much, and I can’t wait to share this with clients who will find new hope where they’ve had failure.
My composts, except in winter, do usually reach more than 150°F. But temperatures that high aren’t necessary.Time also does the trick — more time if the temperature is not a high. Also, no reason that a compost of kitchen refuse, trimmings, and brush won’t heat up.It all depends on the size of the particles, their ratios of inclusion, moisture, and size of pile.
Thanks for the very useful info about compost bins. One question about compost: some folks say that only black and white newspaper should be put in the compost bin, while others say colored paper is OK. What’s your opinion?
I think, but am not sure, that the inks used today are ok for compost. I generally avoid them.
Thanks for the information. Being a compost fan, I appreciate knowing your tips for even better success. Do you use a chipper to break down some of the garden stems and stalks?
No chipper.If I need to chop something up, I use a machete. But I don’t put woody branches in my composts.
How much compost on new veg/ornamental beds……to get things started? What about maintaining fertility in containers, a constant problem for me….?
A one-inch depth of finished compost is sufficient to feed intensively planted vegetables for a whole growing season. I use 1/4 by volume compost in my potting mixes. I re-pot heavy feeders every couple of years or so.
New beds will have poor organic matter %, won’t more be better?
Please explain the question better. No comprendo.
Sorry, what I meant is that a new veg bed, with no prior composting, will have a low percentage of organic matter. Wouldn’t it be beneficial to add a lot more compost than just an inch?
Yes. But one inch would be sufficient for fertility for a season.
I LOVE composting. My problem is with the “harvesting” of it. What do you do with all those spunky little red wigglers that served you so well? Save a bucketful for the next compost pile and send the rest of those brave little soldiers to their death on your garden beds? It’s a philosophical problem for me. 🙂 Thanks for any enlightenment.
No need to add any special micro or macroorganisms to a compost pile. Pile up an organic material, and composting will happen; i.e. provide the food and they will be there.
Ellen, you are talking about vermicompost, in which a species of earthworm does the work of decomposing – and you’re right, they don’t like our outdoor conditions in the Northeast. Lee’s compost is made mostly by bacteria and fungi, with invertebrates moving in only at the end of the process. Bacterial action is what makes it heat up. There are ways to harvest the worm compost and leave most of the worms behind: specifically, pile up the finished compost on a mesh nursery tray over a bin of clean, moist shredded newspaper or coir – whatever you use for worm bedding – and some food scraps. Shine a bright light over the compost overnight. In the morning, most of the worms will have crawled out the bottom and into the fresh bedding – avoiding the light and seeking out food.
Sorry if my earlier comment sounded a bit glib. I’ll try again in another one. I’m really curious to have an answer. Thanks.
I love the idea of composting and have been doing it for several years. With a small urban garden, I end up with almost more than I can use easily. My dilemma – and my question – have to do with the red wigglers themselves. I find it hard just to toss them on my garden beds, knowing that they will not survive there. (Or am I wrong about that? Is there something to do to alleviate that?) I try to give some away. I save a bucket of them to start the next bin. But then, it’s hard just to toss them, gazillions of them, along with the wonderful compost, onto a raised bed, knowing that they won’t do well there. Any philosophical advice, Lee? Thanks for any light you might shed.
A lot of unseen macro and microorganisms die when their environment shifts (such as when a compost pile is spread on the ground). That’s life. Everything is part of a cycle, unseen or seen, long or short. Unphilosophically, perhaps, I wouldn’t worry about them.
Thanks, Lee. I’m a Druid at heart. 🙂 No need to publish this comment.
Hi. I love your compost bin design; sure beats mine, which consists of hay bales. Could you tell me the type or brand of composite lumber that you used. What I am seeing at Home Depot is very expensive.
Thanks
Hay bales are excellent for compost bins — except you have to keep buying new ones and you have to make sure the hay has not been treated with Clopyralid or related, persistent herbicides. I used a variety of brands of boards; the cheapest came from a job lot place. Yes, they are generally expensive, but very longlasting.
Thanks. I use the decomposed hay the next year in the compost, but I didn’t consider whether the hay had been treated. Thanks for the tip.
Winter composting in Vermont was always a challenge, from a cold pile to just getting to the compost bin in deep snow! My solution is to put all food compostables into 5-gallon sheetrock buckets stored in my garage where temperatures rarely drop very far below freezing. They are cold enough to not actively smell but warm enough to not freeze into a block. I also often times layer in a big of old potting soil to “seed” the composting process. In the early spring I take this wealth of material, usually 10 buckets for the two of us, up and layer it in with the clean up materials from my garden to form one big pile (about 3 cubic yards). A week later it is HOT. I may turn it once if I have time but generally by mid summer it is well on its way to being black gold.
Another way is to begin the composting process indoors (at room temperature). All you need are three buckets (five-gallon size should suffice) with loose fitting lids. Fill one with a mixture of equal parts dry sawdust (or peat moss) and dry soil, with a little limestone added. To begin composting, put an inch of dry straw, leaves, or shredded newspaper into the bottom of one of the empty buckets. Dump your kitchen scraps into the bucket as they become available, each time sprinkling on some of the sawdust-soil mixture to absorb odors and excess moisture. If you have a lot of scraps at once, dump in a little at a time, covering each layer with the sawdust-soil mixture. Chop up large pieces and let water drain from anything that is very wet before you toss it in the bucket. (Excerpted form my book, WEEDLESS GARDENING.)
This is a great looking design!
One thing though…
What was your source (and the manufacturer if you know) for your composite lumber? When I look in my local big-box stores, I see Trex and other makes of this, but it’s all intended for decking and as such has an “up” side that gets seen (smooth & planar) and a “down” side that isn’t seen (deeply grooved, presumably to save plastic). I have some concerns that if I were to buy this, the grooved side might cause some fit problems in the area of the notches. I’d rather use boards that are the same (planar) on both sides like a normal wood 1×6, but I haven’t seen those anywhere. In one of your pictures, I see a few grooved boards, but the rest seem so be planar on both sides. Have you tried both? Does it matter?
What is the dimensions of the notch and distance of this from the end? I could eyeball it, but if you’ve got a measurement that you’ve already optimized….
I used a number of brands although I don’t think Trex itself was one of them.One of the brands did have grooves; no problems. I made the notches a couple of inches in from the eds of the boards. The important thing, of course, is that the notches be equidistant from each other on the boards. The notches are slightly wider than the thickness of the boards and their depth is 1/4 the width of the boards. So if the boards are exactly 6″ wide and 1″ thick, the notches would be 1-1/8″ wide and 1-1/2″ deep.
My compost system needs a little work so in the meantime, I wanted to purchase compost to add a 1″ layer on top of my vegetable beds this fall. I can get some from a local garden center who sells in bulk (ie, not in bags) but it seems it’s made from leaves & tree limbs. That ‘leaves’ me worrying about the nitrogen (and nutrient levels in general) though I have been pleased with their soil. My alternate source is composted manure pile (presumably it once had bedding) which has been sitting around for a couple of years. Do you recommend one over the other? Thanks in advance!
The leaves and limbs compost should be fine as long as the leaves and limbs are pretty much no longer visible, i.e. the material is mostly broken down. The nitrogen available from any compost is about the same if the material that fed the compost is decomposed. Downside to the manure compost is, depending on how it was managed, it may have many viable weed seeds.
Out of curiosity, how many bins do you have? Are all of them 5-foot by 5-foot?
I usually have a dozen or so bins, each a little under 5 x 5.
I’ve been seriously composting here in south central Alaska for 3 summers. Our compost bins are about 40x40x36 inches built up slowly over a year. the temp has never exceeded 115 degrees F and most of the time it is 80 to 90 degrees F. The compost is loose, earthy in aroma and unrecognizable which I take to be a good thing.
someone mentioned that I should be concerned about the horse manure component that may carry pathogens like e. coli since it never got hot enough to technically kill them.
Should I use it strictly on non edibles and not the vegetable beds?
Thanks, Lee. Love all the books!
Time and temperature should do in all pathogens. For a book that details the relationships and the major pathogens, see “The Humanure Book” by Joe Jenkins. One of my favorite books, fun to read and vey informative.
Thanks, Lee. Book ordered.
Another thought…. each of the last 3 seasons, I added an inch or two of compost after I pulled the last vegetables in late September.
Freezeup is usually a week later. This spring, after a longer, colder, more traditional winter we had low productivity/fertility with our vegetables.
Do you think the microorganisms in the compost get a chance to innoculate the beds before everything freezes solid? Would I be better off to add fresh compost in the spring? Maybe it makes no difference?
It’s not a question of the the compost inoculating the beds. It’s a question of whether or not the nitrogen tied up in organic matter gets mobilized soon enough for plant use. Over time that should be the case. But a lot of factors can contribute to poor plant growth. If it was fertility, the limiting nutrient was probably nitrogen or phosphorus. Nitrogen deficiency shows up as yellowing of oldest leaves. Phosphorus deficiency often gives oldest leaves a purplish coloration, and often shows up early in the season before roots have grown enough to “explore” enough volume of ground.
Thanks, Lee Book ordered
I have been top dressing with 2 inches of compost when I pull the summer vegetables at the end of September. Freeze up is usually within a week or two here in southcentral Alaska and lasts a full six months.
Am I wasting my efforts with such a short time before the compost freezes? Would I be better off adding fresh compost between rows of vegetables a month earlier. Or maybe top dress in late spring?
I don’t see any reason why compost freezing would be detrimental.
I tried composted in a bit a few years ago. The night I threw in some kitchen scraps and a rat jumped out at me was the end for me. How do I prevent critters from using the compost before I do?
With a rodent-proof compost bin. Metal revolving drum bins are available which are rat proof. Do a web searchh for compost bins and you’ll see some, and others.
Great compost bin design! What have you found to be the best way to cut all of those notches efficiently? Thanks!
I lined a bunch of them up on their edges and clamped them together with large clamps. Then I used a heavy duty router to cut the notches. Still, it took four passes for each gang of notches to get them full width and depth. Not very much fun and very messy but I won’t have to do it again. I wish some manufacturer would make them to my specs, ideally with injection-molded, hollow plastic (for light weight) with internal ribbing for strength.
Lee,
I am new to composting. We have a lot of trees so I have no shortage of leaves. A few questions
1) What is the best ratio of leaves with horse manure etc etc to start and grow the pile.
2) And how thick are layers?
3) can I do several layers at once?
1) It’s hard to say because it depends on how much bedding is mixed with the manure. Try a 1:1 ratio for starters, get a long stemmed compost thermomenter, make sure to water each layer as you add it, and see if it heats up. If so, you’re good. If it starts to smell, perhaps less manure next time.
2) Four inches or so but it’s not that exacting.
3) Yes, but if you do several layers at once, water each layer or the stuff will be too dry. It’s hard to get water deep once you have a few layers.
And finally, remember that no matter what you do, any pile of organic material will eventually turn to compost!
Thank you for the feedback Lee. I don’t see any mention of turning the pile. Other’s emphasize the importance of turning the pile for it to become aerobic. Any suggestions on that?
I build it to have a good mix of air and water. But I do turn it to re-mix the ingredients for more thorough composting, to wet down any dry parts, to fluff up any overly moist parts, and just to see how things are going so I know when I’ll have ready-to-use compost.
I am wondering what tool you used to cut those very crisp notches?
I wasn’t fun. I clamped a bunch of boards close together and then first tried doing it with repeated passes of the circular saw. Then I got a heavy duty router with a wide bit for the job. The router worked better but took four passes per notch, two to get full width of each notch, then two more for full depth. Lots of shavings and noise so eye protection and a respirator and “ear muffs” were needed, and a tarp to collect and trash the “fake wood” debris.
We are using a skill saw followed by a jigsaw. We clamped 18 5 foot long ‘boards’ together with two bar clamps. Next we used a skill saw to make 2” deep cuts about 2 inches from each end of the boards. We flipped the boards and repeated that. We carefully made 4 passes at each spot with the skill saw.
Next we cut out the notches out neatly with the jigsaw.
It worked fairly well. Thanks for your compost bin design.
I think that was the way I did it at first. Glad it worked for you.
Just listened to the Sustainable World Radio Podcast about “Gardening like Nature” and I’m in awe of your composting skills and am totally inspired! Thank so much and keep creating. ❤️! Naomi. Awesome Info.
Thank you.