
NEW PLANTS, UP IN THE AIR
Asexual Propagation
One of my great enjoyments in gardening is propagating plants. So many ways to do it! You can take stem cuttings or root cuttings, or you can serpentine layer, tip layer, or stool layer. And then there’s grafting, of which, as with layering and cuttage, many, many variations exist. Whole books have been written on plant propagation, even solely on grafting. My favorites for these two topics are Hartmann and Kester’s Plant Propagation: Principles and Practices and R. J. Garner’s Grafter’s Handbook.
The above mentioned methods of propagation are asexual. New plants are made from mother tissue of an existing plant. As such, all the new plants are clones of the mother plant. Not always, though.
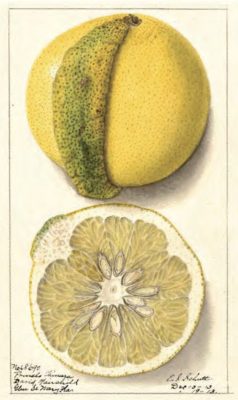
Grapefruit chimera
A plant chimera, analogous to the lion-goat-dragon of mythology, is a plant made up of two genetically different cells, a plant mosaic. Depending on what part of the plant you take for propagation, you end up with a clone of one or the other cell type, or, perhaps, both (the chimera). A plant usually broadcasts that it’s a chimera with splotches or lines of color different from the surrounding color of the leaves, flowers, or fruits. (Splotches or lines of color can also be caused by viruses.)
If you grow thornless blackberries, you’re growing a chimera. Blackberry thorniness lies genetically in the outermost cell layer of stems. Roots lack that outermost layer, so if you make new plants from root cuttings of your thornless plants, watch out for those vicious thorns. Some ways to propagate thornless plants are by tip layering or by stem cuttings.
(I gleaned the information about chimeras from my own book, The Ever Curious Gardener: Using a Little Natural Science for a Much Better Garden.)
Bring an Old Houseplant Down to Size
Much as I love to propagate plants, two problems arise for me. First, what to do with all the extra plants, often more than I could possibly give away or sell? And second, either I or nature might lack the patience to see it through . . . which brings me to air layering.
Air layering, sometimes called marcottage, is a way to deal with a plant that grows too big. The “patience” problem of air layering is that with some plants, the process might be very slow. If air layering requires more than one growing season, cold winter temperatures could kill any roots trying to develop, even for otherwise cold-hardy plants.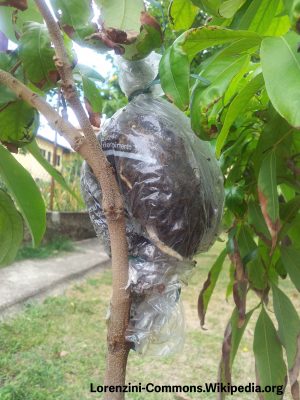
Houseplants are another story. A houseplant, whose size could be limited by ceiling height or the amount of muscle needed to bring the plant indoors and out with the changing seasons, is a good candidate for air layering. Plants such as rubber tree, Norfolk Island pine, and dracena inevitably grow too tall for a room. Compounding that problem, as these plants press skyward, they also shed their lowest leaves, leaving only bare trunks at eye level.
One obvious solution to these problems would be to get rid of a plant and start every decade with a short, young plant. Sentimental attachments make this option impossible. Air layering is a way to make a new plant from the old friend. The advantage to this technique is that roots are induced to form along the stem while it is still attached to, and nourished by, the plant. With a conventional stem cutting, there’s always danger of the top drying out before roots form; not so with air-layering.
Step by Step Marcottage
To air-layer, select a six- to ten-inch segment of stem below the tip of the stem, depending on how tall you want your new plant to be. This is where the plant will form roots, so remove any leaves from that segment.
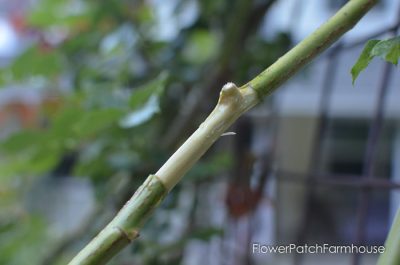 Stimulate root formation by wounding the bark. Remove a one-half to one-inch wide strip of bark removed from around the stem, scrape the bark, or cut a two-inch long notch. In the latter case, prop the notch open with a piece of a toothpick. It’s not absolutely necessary, but helps, to dust the cut surface with a rooting powder.
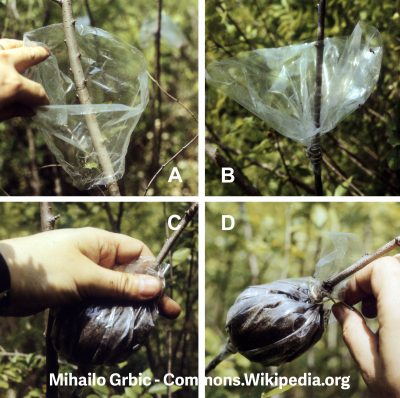 Putting the wounded portion in a dark, dank environment coaxes roots to form. Take a handful of sphagnum moss, thoroughly wet it, then squeeze out excess moisture. Cut this mass in half and sandwich the wounded portion of stem between the halves. Seal in moisture and hold the sphagnum moss in place with clear plastic film. Tightly seal the top and the bottom of the plastic to the stem with a wrap of electrical tape. Finally, cover the plastic with aluminum foil to exclude light.
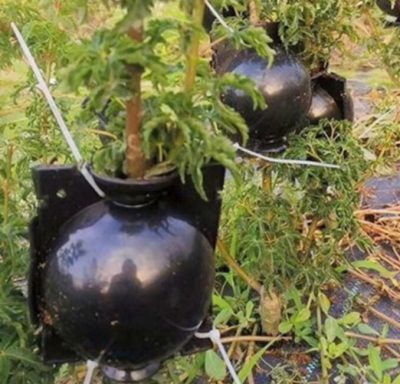
 Reusable plastic “pods” are available to more conveniently hold everything in place. I just ordered one and will give it a try.
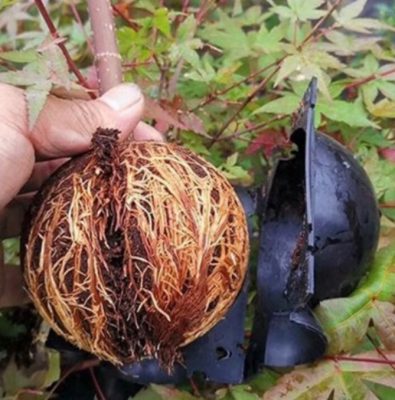
Every few weeks, take a peek beneath the foil or within the pod. When roots have filled the ball of sphagnum moss cut the stem with its new roots from the mother plant. If the plant is in active growth, wait until growth slows down before cutting off the air-layer.
Remove the foil, the tape, and the plastic, or the pod, and pot the rooted stem in potting soil. The new plant needs to get used to its new life independent of its mother, so keep it shaded for a couple of weeks while new roots grow into the potting soil.
Now we’re back to deciding about what to do with the mother plant. It’s somewhat shorter since the air-layered stem was cut off, but still has the bare stem — perhaps you still want to save it. If so, I suggest root and stem pruning to reduce plant size above and below ground. Of course, with your air layer and your renovated mother (plant), you now have two plants. It’s a slippery slope.


are black soldier fly larvae good for my compost bin?
I wasn’t familiar with them but after taking a quick look at their wiki page, https://en.wikipedia.org/wiki/Hermetia_illucens, I would say “yes.” Their larvae can also be used for human or animal food.