STUFFED

Breadcrumb Seeds?

Who’s getting stuffed for Thanksgiving this year, you or your turkey, or your tofurkey? A good stuffing (of the real or faux bird) is good enough to eat sans bird. And, for best quality, you can grow it yourself. Not by dropping seeds of a “stuffing plant” in the soil, but by planting all the ingredients you need.

The bread and butter of any stuffing is some starchy food, often bread and butter itself, the bread usually as crumbs. There’s no breadcrumb plant, so forget about growing breadcrumbs. Not that you couldn’t buy some wheat berries, plant them next spring, harvest the grain when the plants dry down, thresh and winnow out the berries, grind them into flour, make the flour into bread, then let the bread go stale and pound it into bread crumbs. Whew! Most of us are not going to do this. 

“The Bread Tree”

As an alternative to bread crumbs, might I suggest chestnuts (Castanea spp.)? Chestnut falling from its burr
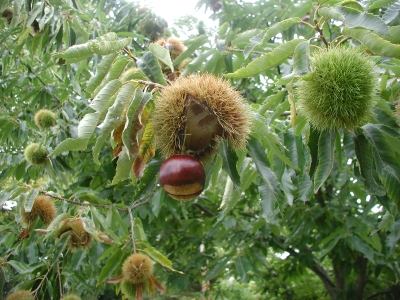
They’re often billed as the “bread tree” because in contrast to other nuts, which are high in fats and protein, chestnuts are high in starch. Obviously, you’re not going to be eating home-grown chestnut stuffing this year, or next, or the next; it takes awhile for a chestnut tree to start bearing. Not that long though. I’ve had plants grown from seed begin to bear within six years, and a grafted tree from a nursery should bear even sooner than that.

(Although their nuts look similar, chestnuts should not be confused with horse chestnuts, Hippocastanum spp.. The latter are toxic. Horse chestnuts have compound leaves, very showy flowers, and their nuts are encased in a spiky capsule. Edible chestnuts have simple leaves, nonshowy flowers, and the nuts are encased in a cupule riddled with very sharp spines.)

The North American, native and majestic American chestnut (C. dentata) has been decimated by chestnut blight but there are, fortunately other species that resist the blight. A good choice for nut production would be species or hybrids of Chinese chestnut (C. mollisima). Two different varieties are needed for cross-pollination.Chestnuts in a basket

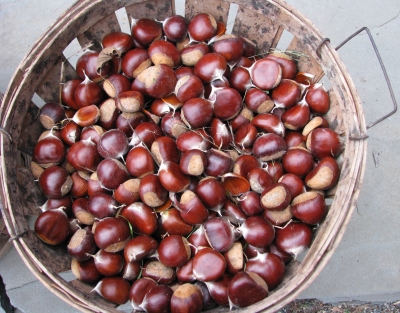
The only caution in planting chestnut trees is to avoid planting them near where people frequently walk. Each fall the ground beneath the trees is littered with the opened, spiny cupules.
Chestnut tree in summer
Chestnut tree in autumn

More Crumby Alternatives

While you are waiting to harvest chestnuts, make stuffing based on one of the more quickly grown starchy vegetables. Potatoes, for instance. The best potatoes for making stuffing will be those that are dry and mealy, russet varieties such as Goldrush, Burbank, and Idaho. 

“Dry and mealy” is also the mantra to use when choosing a winter squash variety to grow as a base for stuffing. The phrase “squash stuffing” has a nice ring to it, doesn’t it? My recommendation for a dry, mealy squash is a buttercup type called Chestnut or Sweet Mama. 

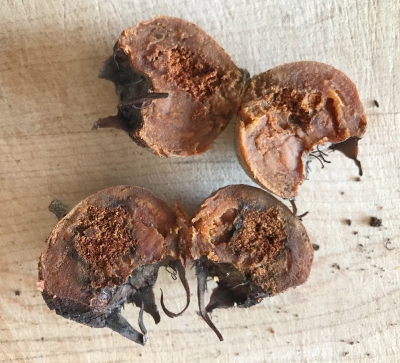
If you really want a truly authentic starchy base for stuffing, the plant to grow is nu nu, a golfball-sized, starchy tuber also called makoosit or groundnut (Apios americana). Groundnut tubers
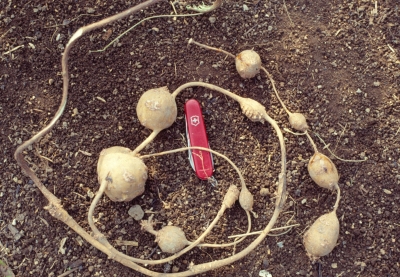
Native Americans harvested and ate nu nu, and this was one of the foods crucial in helping the Pilgrims survive their first winters in Massachusetts.

Be careful planting nu nu because it can spread like a weed to give you more stuff for stuffing than you would ever need. I planted it in a perennial flower bed decades ago. That was the wrong place for it, and I’ve spent decades trying to weed it out, unsuccessfully.

On the plus side, the plants do sport decorative and sweetly fragrant, lilac colored flowers, so it is worth growing where it can be regimented. Nu nu tubers grow attached a few inches apart along underground stems.
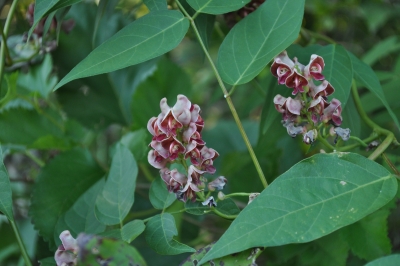
Groundnut flowers

Seasonal Seasonings

Stuffing isn’t only about the bread-y ingredient. It also needs some seasoning. Parsley, sage, rosemary, and thyme, summer savory, sweet marjoram — they’re all very easy to grow. Sage and thyme are perennials, each also available in designer flavors. Pineapple sage, caraway thyme, and lemon thyme, for instance.

Potted rosemary tree in winter

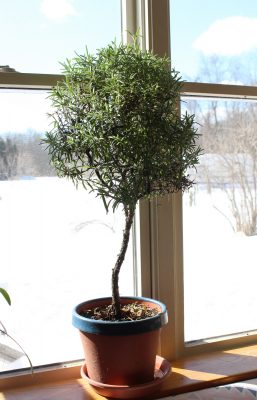
Rosemary is also a perennial, cold hardy to zone 7, possibly even zone 6. It’s is not hardy here but I grow it as a “standard” (trained as a small tree) in a pot that summers outdoors and lives indoors at a sunny kitchen window in winter to provide pretty greenery, piney fragrance, and savory snippings.

Some vegetables from the garden round out and make more interesting a stuffing. Onion, celery, and carrots are mainstays, but vegetables such as parsnips and garlic can make special — and powerful — flavor contributions. 

Have a happy and healthy Thanksgiving!

PREPARING FIGS FOR A COLD WINTER

They’re Not Tropical

Too many people think fig trees are tropical plants. They’re not. They’re subtropical plants and that’s one reason those of us living in cold winter climates can harvest fresh, ripe figs. In fact, fig trees like that little rest that cold weather offers them.Fig fruits in plate

Here in Zone 5 (average winter lows of minus 10 to minus 20° F), I grow figs a number of ways. Figs are cold hardy to the low ‘teens, too cold for even subtropical plants to grow outdoors in the ground, their stems splayed to cold winter air like my apples and pears. Their roots, especially if mulched, generally will survive winters here in the relatively warmer temperatures underground. But then new shoot growth must originate at ground level, and the growing season isn’t long enough for figs that develop on those shoots to ripen.

Potted

  Some of my figs, like many of yours, are in pots.

With nighttime temperatures now often below freezing, there’s an urge to grab the potted fig and carry it indoors. Don’t! As I wrote, fig trees like a little cold weather. Experiencing some cold weather also toughens them to be more able to withstand even colder weather. My goal is to get these potted plants into a deep sleep, and to maintain that state as long as possible through winter, ideally until they’re ready to be carried outdoors again in spring.

My friend Sara's fig

My friend Sara’s fig last summer

If temperatures are going to be super cold, below the low ‘teens, move the plant to a temporary, but cool, location such as an unheated garage or mudroom, or garden shed.

Plants might still sport some leaves this time of year. Perhaps some of those leaves have been frosted. Not to worry.


Eventually, a potted fig needs to be moved to a winter home. Around here, at least, not yet. Typically, I leave my potted fig trees outside — in a slightly sheltered spot near a wall of my home where temperatures are modulated — until sometime in December. A fully dormant fig tree sheds its leaves so won’t need light in winter. If any of my plants are still holding onto their leaves, I just pull them off before the plants move to their winter home.

The winter home should be cold, but not frigid, ideally 30 to 45°F. That previously mentioned unheated garage or mudroom, or garden shed might be suitable. A minimum-maximum thermometer is an inexpensive way to know just how cold a site gets during winter even when you’re not in there or looking — at 2 AM, for example. 

Some of my potted figs retire to my basement for winter, where winter temperatures are usually 40 to 45°F.

Fig trees stored in cold basement

Kadota fig stored in cold basement

More recently, I’ve set up an insulated, walk-in cooler, mostly for storing fruits and vegetables. There’s also plenty of space for some potted fig trees. The cooler, which needs a little heat in the dead of winter, maintains a pretty consistent temperature of 39° F.

To help the plants remain asleep, I keep them on the dry side, perhaps watering them once or twice during this period.

To a point, the more stem growth on a fig tree, the more fruit it bears. So a potted fig can only bear so much fruit. I want more figs from some of my trees.

Innovations for Greater Yields

Years ago, I built a greenhouse in which to grow cool-weather-loving salad stuff and greens such as lettuce, celery, kale, chard, arugula, mustard, mâche, and claytonia through winter. I soon realized that the hot summers and the cool (never below about 35°F) winters in the greenhouse mimicked the Mediterranean climate that figs call home. So I planted four fig trees right in the ground in the greenhouse. The vegetables don’t mind their figgy neighbors because they’re leafless in winter.

Those fig trees are more than just leafless in winter; they’re also pretty much stemless. Each tree is trained to have a short trunk off which grows one or two permanent, horizontal arms. (This method of training is called espalier.) Espalier fig tree

Fig trees in greenhouse

Fig fruits on branches
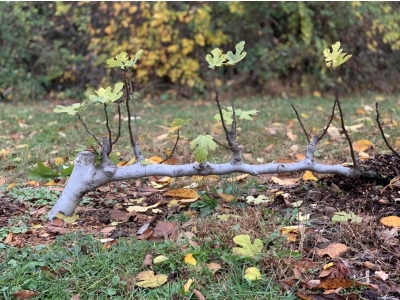
Fruits are borne on shoots that grow vertically from these arms. Tomorrow I’ll lop all those vertical shoots back to the arms. Next year, new shoots will bear fruits and be cut back next fall, and the year after that, new shoots . . . and so on.Pruned greenhouse fig

I’ve even used this method, this time with the horizontal arm trained just a few inches above ground level, for a fig tree I have growing outside. That low-growing arm is easily covered with a blanket of leaves, straw, or some other insulating material, how much depends on the depth of wither cold expected.Espalier fig outdoors

Once again, I’ll delay covering the plant until colder temperatures arrive so that the plant is hardened more against cold and goes into winter as dormant as possible.

Over the years, other figs of mine have weathered cold winters also by such methods as being bent over and covered to keep them warm and outdoors, by being grown in pots sunk into the ground then lifted, before the arrival of frigid weather. etc., etc. You want to harvest fresh figs in summer? There are many paths to this mountaintop.

The takeaway today is: Don’t protect your fig tree from too much cold too soon. Let the plant experience and benefit from the sleep-inducing and hardiness that some exposure brings.

And if you want to know more about growing figs in cold climate — varieties, method details, pruning,  accelerating ripening, potting mixes, and more — see my book with the eponymous title GROWING FIGS IN COLD CLIMATES (available from the usual sources as well as, signed, from my website).Here’s a very short video I made back in October about some methods of growing figs in cold climates and my new book: Fig video

BEAUTY AND FLAVOR

The Good, the Bad, and the Ugly (in my opinion)

For better or worse, every year nurseries and seed companies send me a few plants or seeds to try out and perhaps write about. The “for better” part is that I get to grow a lot of worthwhile plants. The “for worse part” is that I have to grow some garden “dogs.” (I use the word “dogs” disparagingly, with apologies to Sammy and Daisy, my good and true canines.) Before my memory fades, let me jot down impressions of a quartet of low, mounded annuals that I trialed this year.

Calibrachoa Superbells Blackberry Punch was billed as heat and drought tolerant, which it was. As billed, it also was smothered in flowers all summer long. It’s a petunia relative and look-alike. Still, I give it thumbs down. But that’s just me; I don’t particularly like purple flowers, and especially those that are purple with dark purple centers.

I’ll have to give Verbena Superbena Royale Chambray a similar thumbs down. superbena royale chambray
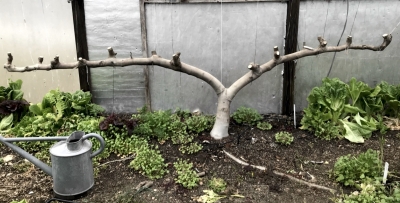
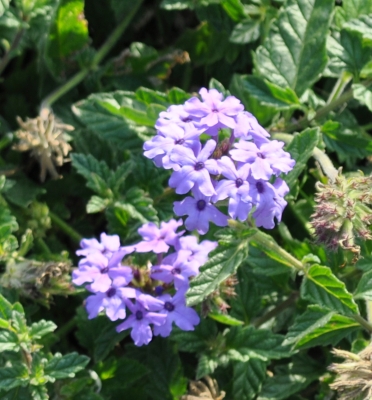
It’s that purple again, light purple in this case. Also, the plants weren’t exactly smothered with flowers and most prominent, then, were the leaves which were not particularly attractive.

Golddust (Mecardonia hybrid) made tight mounds of small yellow flowers nestled among small yellow leaves. I give this one a partial thumbs up. The flowers were too small and there weren’t enough of them even if the leaves alone did make pleasant, lime green mounds.

And finally, a rousing thumbs up for Goldilocks Rocks (Bidens ferulifolia). This plant also was a low mound of tiny leaves, needle-shaped this time. Sprinkled generously on top of the leaves all summer long were sunny yellow blooms, each about an inch across and resembling single marigolds. Flowering was nonstop, even up through the many recent frosts here, right down to 24° F.
Goldilocks Rocks
Bidens in its botanical name caused me slight pause when I planted Goldilocks, not because of any displeasure with our president, but because the common name for this genus is sticktight, or beggartick. You know those half-inch, flat, 2-pronged burrs that attach to animals — and, inconveniently, your socks — when you walk through wild meadows? Bidens, sticktightsThose are Bidens, trying to spread. (Not to be confused with the round, marble-size burs of burdock.)

No problem with Goldilocks Rocks that lined my vegetable garden paths. The flowers were too low to reach any higher than my shoes.

Ugly, Beautiful, and Tasty

Despite the recent spate of cold temperatures, there’s still fruit out in the garden, hanging on and ready for picking at my leisure.

The first is medlar (Mespilus germanica), a fruit that was popular in the Middle Ages, but not now. Its unpopularity now is due mostly to its appearance. One writer described it as “a crabby-looking, brownish-green, truncated, little spheroid of unsympathetic appearance.” The fruits resemble small, russeted apples, tinged dull yellow or red, with their calyx ends (across from the stems) flared open. I happen to find that look attractive. Medlar fruit  in summer

The harvested fruit needs to sit on a counter a few days, like pears, before it’s ready to eat. Worse, from a commercial standpoint these days, when ready to eat the firm, white flesh turns to brown mush. Yechhh! Except that it’s delicious, with a refreshing briskness and winy overtones, like old-fashioned applesauce laced with cinnamon.Medlar ready to eat

The plant itself is quite beautiful, a small rustic-looking tree with elbowed limbs. In late spring individual white blossoms resembling wild roses festoon the branches. In autumn, medlar leaves turn warm, rich shades of yellow, orange, and russet. Medlar in fall

I would bill medlar as very easy to grow, except here on the farmden. A few years ago, a pest started attacking my fruits, turning the flesh dry, rust-colored, and inedible. I have yet to identify this pest (rust?) which is absent just about everywhere else. Do any other of you few medlar growers have anything to say about this pest, if you’ve seen it?Medlar pest

Beautiful and Tasty

Walking around my home to the bed supported by a low, stone wall along my front walkway, we come to lingonberry (Vaccinium vitis-idaea). This fruit never fails to stir a smile, a dreamy look, perhaps even a tear in the eye of Scandinavians away from their native land. Nonetheless, it’s actually is native throughout the colder zones of the northern hemisphere.

Lingonberry is an evergreen groundcover growing only a few inches high; I grow it both for its beauty and its fruit. In spring the cutest little white, urn-shaped blossoms dangle upside down (upside down for an urn, that is) singly or in clusters near the ends of thin, semi-woody stems. Lingonberry floweringThe bright red berries hang on the plants for a long time, well into winter, with their backdrop of holly-green, glossy leaves making a perfect holiday decoration in situ.Lingonberry fruiting

The key to success with lingonberries is suitable soil. Like blueberries, a close relative, they enjoy, they demand, a soil rich in organic matter, well aerated, consistently moist, and very acidic. I created these conditions with some peat moss in each planting hole, a year ‘round mulch of wood chips, leaves or sawdust, topped up annually, and sulfur applied to bring soil pH to between 4 and 5.5.

Lingonberries have been put to lots of culinary uses besides the usual lingonberry jam. I like to eat them straight from the plants. They’re not sweet, but they are delicious.

(I considered the two above-mentioned fruits so worthwhile that each warranted a chapter in my book Uncommon Fruits for Every Garden. This book’s out of print now, but is due to be revised and re-issued again in a couple of years. Some of the information in that book can be found in my currently available books Grow Fruit Naturally and Landscaping with Fruit.)


CATS ON A COOL, GREEN ROOF

Why and How to Build

I’ve got to learn to look up more, you know, the way tourists do; natives generally fix their gazes straight ahead to a destination or downwards, in thought. I am reminded of this when a visitor (a “tourist” in this context) walks up my front path, smiles, and tells me, “I like your green roof.” So then I (the “native” in this context) look up and join in the appreciation.Two cats on my green roof

My green roof was born about twenty years ago. After fumbling too many times with packages or keys in the rain at the front door, the time had come build protection from the elements. Rather than cover just the area around the door, this cover would extend over a small patio. And rather than just shingle the roof, why not make it a planted roof, a “green roof?”

So my friend Bill and I built a sturdy, shallowly sloped roof supported on three corners by the walls of my house, and by an 8 x 8 white oak post in its fourth corner.Roof, ledger up 
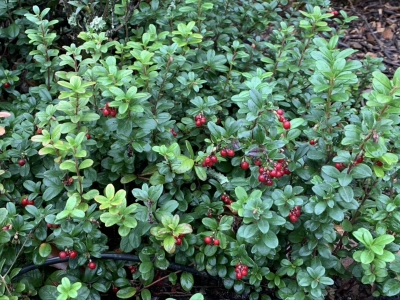
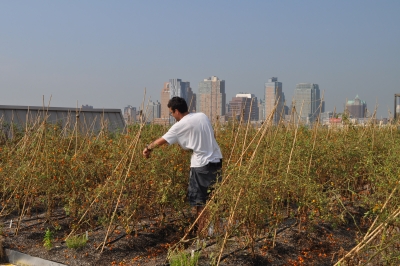
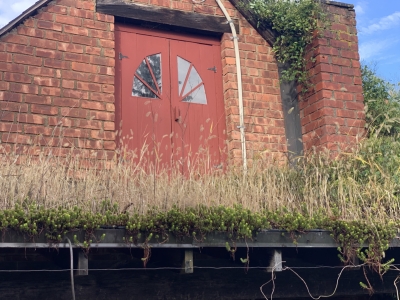
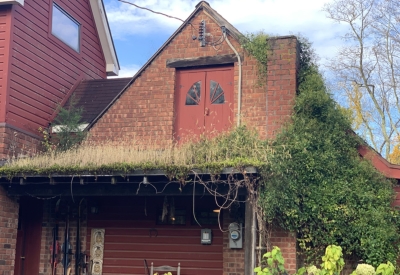
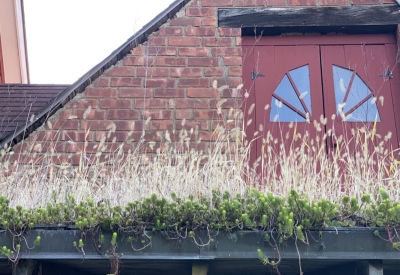
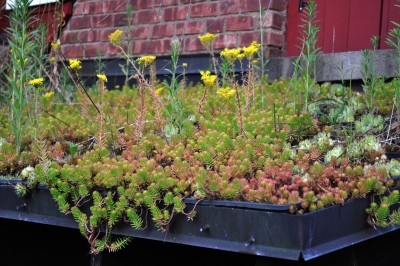
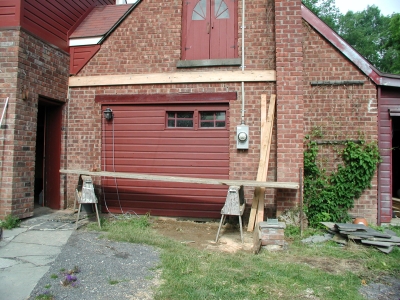
The roof had enough slope so plants could be seen from the path, yet not so steep that a hard rain would wash the soil away.Roof completed

To keep the wooden structure dry, it was covered with EPDM roofing material and flashed with copper. A two-inch high lip of copper flashing along the low edge keeps plants and soil from sliding down off the roof. To prevent water from puddling at this lower end, I drilled holes and soldered short lengths of copper tubing at intervals into the lip, figuring that excess water would stream decoratively from each tube during rains. Roof drains
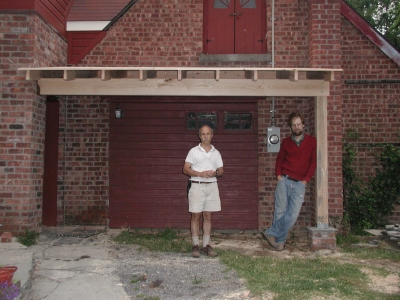
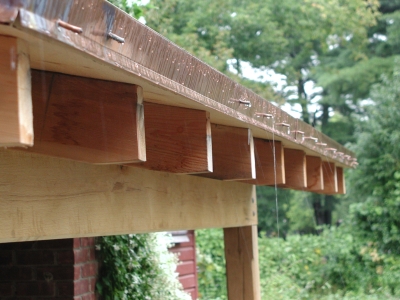
(It streamed, but not so decoratively, because some tubes kept getting clogged and the bottom edge of the roof was not exactly horizontal so the flow burden was taken up by only a few tubes.)

How and What to Plant

Next was the gardening part of the roof. To keep the weight down, for low fertility to suppress weeds, and for good moisture retention I made a planting mix of equal parts peat moss and calcined montmorillonite clay (often sold as kitty litter).

The root environment on the roof was going to be harsh for plants. Only a two-inch depth of root run. And, in contrast to the moderated temperatures within soil out in open ground, roots on this shallow roof would experience mad swings in temperature that would closely mirror that of the air. And even though peat moss sucks up and holds moisture, there’s not much peat moss moisture to draw from in 2 inches of rooting.

The plant choice, given the conditions, became obvious: some kind of hardy, succulent plant. I chose hens-and-chicks. After filling enough 24 x 10 inch planting trays with the planting mix, I plugged in hens-and-chicks plants every 4 inches in each direction. Hens-and-chicks in trays
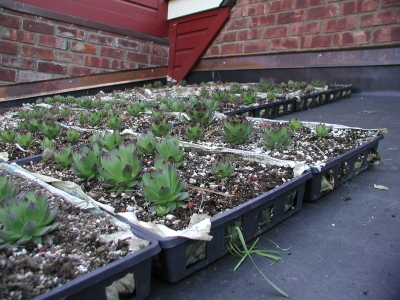
All this planting took place almost a year before the roof was readied for the plants, important so the hen-and-chicks could make enough “chicks” to spread and pretty much cover the planting trays, which otherwise would have left too much planting mix exposed to washing from rainfall.

Up the trays eventually went on sloping roof, laid down like tiles on a tile floor. Everything looked very neat and trim.Green roof, early on

Nature Collaborates

Despite very little intervention from me, the years have brought some changes to that green roof. This was not a garden area that I ever planned to weed, and I stuck to my plan. I figured that a green roof with a weed-free planting mix, sheltered on two sides by walls, and eight to ten feet off the ground would not harbor weeds.

I was wrong. Some weeds have moved in. Well, not weeds per se, because a “weed” is plant in the wrong place, and the roof is welcome to pretty much any plant.

Gazing up on my roof now, I see, in addition to the original hens-and-chicks, plenty of foxtail grass, quite decorative through the year with green shoots in spring and tawny, fuzzy foxtails in fall and winter. Also a single cedar tree about two feet high.Roof with weeds
More weeds on roof

I had a hand in introducing another sedum, Angelina. This sedum has borne small, yellow flowers and, just as decorative, its fleshy leaves turn a deep red color in winter. Angelina started out as a single plant I set in a nearby stone wall; over time a few plants of it appeared up on the roof. Angelina on roof

Angelina flowering
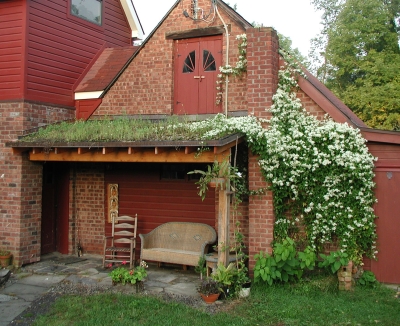
She looked good up there, especially when draped over the front lip. She also multiplied rapidly both on the wall and on the roof. To further encourage her, I grab bunches wherever in excess on the wall and toss them up on the roof to root.

One year I also planted oats left over from cover cropping in the vegetable garden. Oats’ extensive roots would be good to further knit together the rooting mix and lessen chances of rain washing it down. Planting involved nothing more than grabbing handfuls of oat seed, tossing them up on the roof, then waiting for rain.

Writing about my green roof has encouraged me to more frequently look up at it. It does bring a smile. Is that because there’s something anomalous about an aerial garden?

Brooklyn Grange

Urban farm high in the sky at Brooklyn Grange