Posts

I Clothe The Ground

Sowing My Oats

Whew! Just made it under the wire. Sowing cover crops, that is. (Cover crops are plants grown solely to improve the soil.)

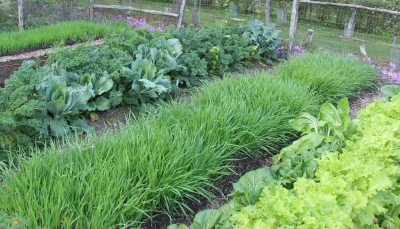
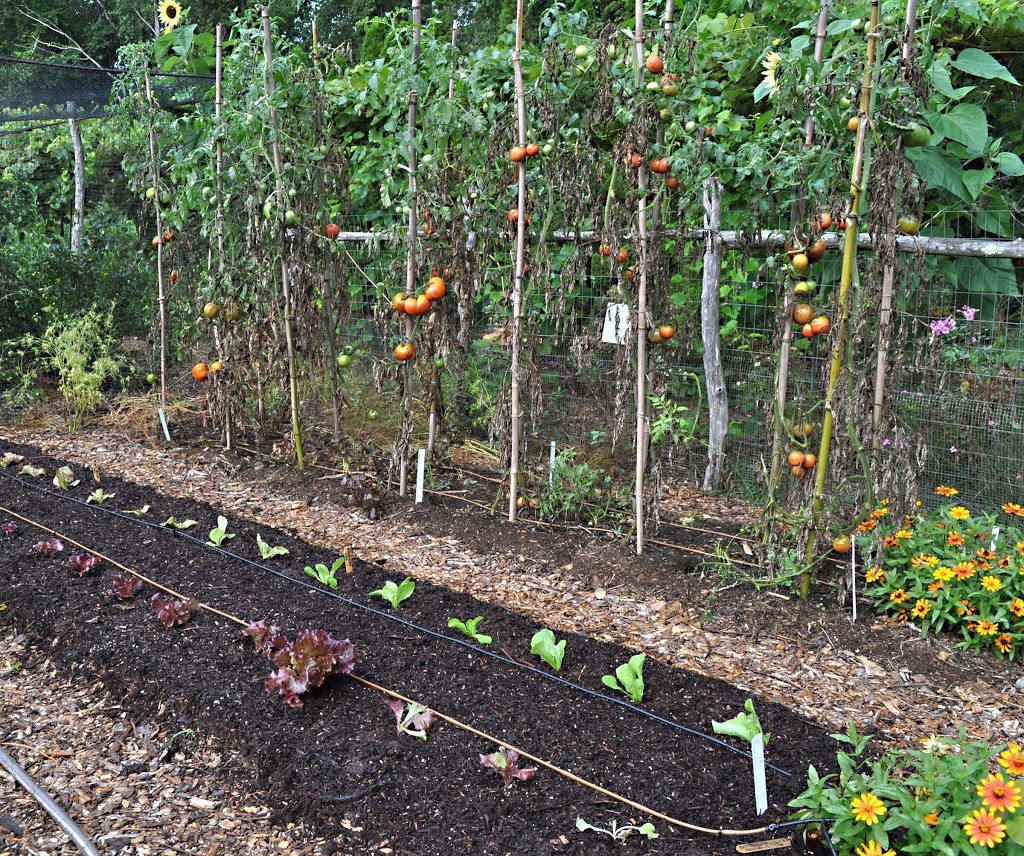
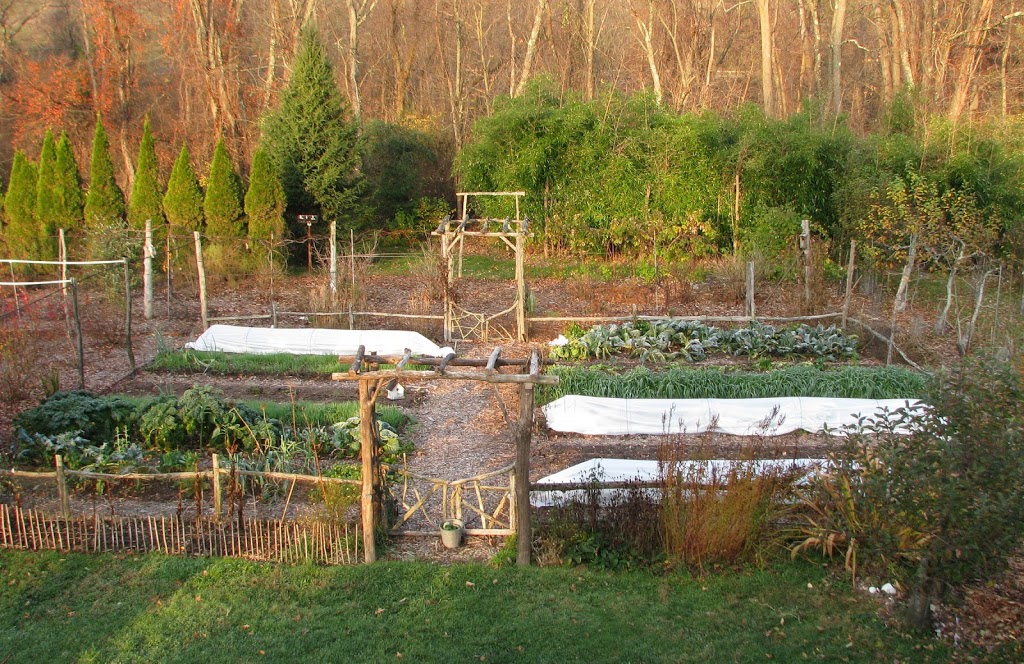
With the vegetable garden still filled to the brim, now overflowing with cabbage, kale, mustard, arugula, lettuce, Chinese cabbages, and radishes, with even corn and peppers still yielding well, where am I going to find room to plant a cover crop? Despite the cornucopia, some plants — the corn, peppers, and other warmth-loving vegetables — are on their way out. As they peter out, it’s too late in the season to sow any more radishes, lettuce, or any of the other cool season crops; there’s not enough time or sunlight for them to mature.

No reason to leave a recently cleared bed of early corn, early beans, or okra bare, so I planted those beds to a cover crop. Problem is that after a certain time of year, there’s not enough time or sunlight for even a cover crop to grow enough to do some good for the soil. My date for that is early October; further south it will be later; further north, earlier.

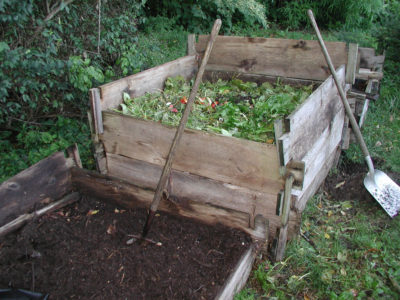
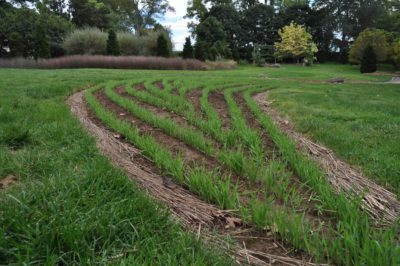
Right after clearing a bed of spent vegetable plants, I go over it carefully to remove every weed. Then I smooth the ground and give it a thorough watering to give the cover crop plants a quick start. What plants? Oats.Oat cover crop sequence

I grow oats as a cover crop because I never till the soil in my vegetable beds. Oats loves the cool weather of fall and early winter, quickly sprouting into a lush, green carpet. By February, though, that lush carpet turns tawny and flops down on the ground, dead. Come spring, I could plant right through that mulch. Or, it could be rolled up with a grass rake, or just pulled off barehanded; removing it speeds soil warming.

Other good cover crops for no-till gardens are barley and, to also add nitrogen to the soil, peas. Gardeners who till their ground usually plant rye grain as a cover crop. It survives winter, then grows with vengeance in spring; hence the need for tillage.

Back to that watered bed. I sprinkle the bed with oat seeds, then top the bed with an inch of compost. Green sprouts poke through that compost blanket in a couple of days or so.
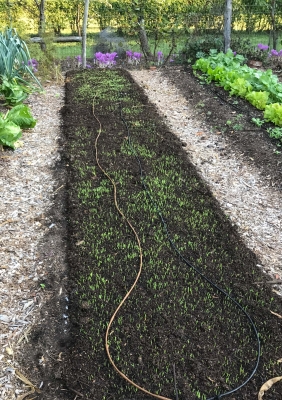
Oats sprouting

Is It Worth It?

Planting a cover crop in a bed that gets an annual dressing of an inch depth of compost may seem like “carrying coals to Newcastle.” After all, one potential benefit of cover crops are that they add organic matter to the soil. That inch of compost is already organic matter, and plenty of it.

In fact, I have never observed any better growth from a bed that has been cover cropped over one that received only the compost blanket. And for some reason, the cover cropped beds always seem to have more weeds in them in spring — surprising, since a cover crop should be shading or pumping out natural chemicals to suppress weeds! Perhaps some weeds insinuate themselves in fall in among the oat plants, where I can’t see them. My plan, this spring, is to cover some of the cover-cropped beds for a week or so with a black blanket (recycled billboard tarp, available online) which will warm the ground up quicker and snuff out potential weeds.

Even cover crops’ potential benefit of enriching the ground with organic matter doesn’t always pan out, and surely not the way I plant them. Organic matter is largely carbon. Young plants are relatively rich in nitrogen and poor in carbon, a ratio that reverses as the plants age. A young cover crop, then, doesn’t add organic matter to the soil; its excess nitrogen could even contribute to the oxidation and loss of organic matter. Oats planted this time of year grow lushly, but never mature enough to tip the scales in that early ratio of nitrogen and carbon.

(I dive into more depth about cover crops in my book Weedless Gardening.)

Cover Crop Brings Many Benefits

Still, I’m planting a cover crop — for some of its other benefits.

Rain and snow in the coming months can wash nutrients down and out of the soil. The oat roots, as long as they are alive, can suck up those errant nutrients and keep them nearer the surface for next season’s vegetable plants. Cover crops also soften the impact of rain pounding on the soil, preventing erosion.
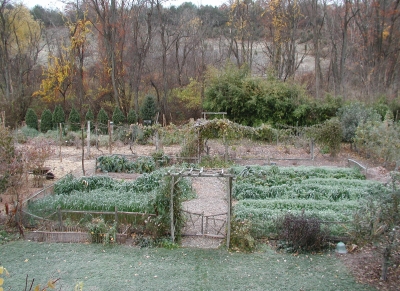
Oats in January

Oats in January

As roots of cover crop plants push through and ramify in the soil, they nudge soil particles around to improve tilth (structure of the soil) making it crumbly, all to the liking of plants. These roots also team up and nourish other organisms, such as fungi, that also improve tilth. Channels of varying size are left in the soil as roots die off and rot away. Such channels provide easy conduits for new roots, as well as for air and water.

And finally, I’m planting cover crops for myself. With green fading from the landscape into reds, yellows and tawny browns, it’s refreshing to look upon the green carpet rather than bare soil in the vegetable garden.Oat cover crop

GOOD FOR CROPS, GOOD FOR THE EARTH

How to be a Good Gardener/Farmer, Simplified

    “The poor farmer grows weeds, the mediorcre farmer grows crops, the good farmer grows soil.” How true, when I think of the good farmers and gardeners I’ve visited over the years. I aspire to be a good farmdener and spend a lot of time trying to grow soil.
    Growing soil isn’t all that complicated. (You do need to start with good drainage of water.)
    First, keep the ground covered. Organic mulches, such as leaves, straw, and wood shavings, keep rain from pounding the surface. The pounding drives small soil particles into pores, sealing the soil surface so water can’t percolate in. Bacteria, fungi, worms, and other soil organisms gobble up organic mulches, releasing nutrients and forming humus, which improves percolation and moisture retention, and makes room also for air in the soil. In my gardens, I never want to see bare ground.Bare, cracked soil
    Live plants likewise protect the ground. The plants might be cabbages, marigolds, carrots, and other garden plants. They might be cover crops, such as rye, oats, peas, or buckwheat, sown specifically to clothe and protect the ground during or at the end of the growing season, and through winter. They might even be weeds — Mother Nature’s way of protecting her soil.
    Second, maintain soil organic matter. Mulches do this, as do growing plants. I go one step further, and import organic matter. Bushel after bushel of leaves that have been raked and bagged by neighbors are collected are unbagged and unraked once they arrive here. Leaves that have been vacuumed into a landscaper’s large truck and then left here in a pile get unpiled here one pitchfork and garden cart at a time.
    I also pitchfork horse manure into the bed of my pickup truck at a local stable. Mostly, that manure is transmuted into compost and then slathered onto beds in the vegetable garden.

Compost, in the making

Compost, in the making

    I also import — really just transfer — some organic material from one part of my property to another. My small hayfield gets mowed once a year by tractor to keep it from becoming forest but parts of it I periodically scythe, these mowings to feed, along with the horse manure (and kitchen waste, old garden plants, etc.), compost piles.
    The third key to growing soil is to maintain fertility. A soil test can confirm what, if anything, is needed. If the first and second points in growing soil are followed, fertility is probably up to snuff.
    And finally, the fourth key to growing soil: Minimize soil disturbance, avoiding tillage or, at least, excessive tillage. Tillage mixes so much oxygen into the ground that soil organisms go into a feeding frenzy, in so doing gobbling up organic matter too fast. Thus, many of the above benefits, physical, biological, and nutritional, waft away, literally, as carbon dioxide.
    Farming and gardening aren’t “natural.” At their best, they are a balancing act that leans towards emulating natural systems. Which is to say, for instance, that tillage, is not all bad; it can be part of good soil growing if not done to excess and points one, two, and three are followed.
    A measure of “organic matter content” (OMC), from a soil test, provides a rough indication of soil growing progress. Less than 3% means more work is needed. Five percent, or more, is very good. (My vegetable beds are at about 15%.)

Blue-Green Algae Redux

    Last week’s notes about the darker side — and the brighter side — of blue-green algae may have left everyone feeling helpless. After all, you can’t change the hot dry weather that is, in part, responsible for the current blooms. But nitrogen, phosphorus, and other minerals washing into waterways to feed the bacteria also play a role, and it’s something over which we have control.
    Improper septic systems are one culprit.
    More topical culprits are mineral nutrients originating in backyards and farm fields. Too many farmers and homeowners subscribe to the philosophy that “if a little is good, more is better,” when it comes to fertilizer. Not so. Too much fertilizer not only is a waste of money; it damages or kills plants and, with rain, leaches through or runs off the soil to eventually find its way into waterways. A soil test will tell what nutrients, if any, are needed.
    Even better, if fertilizer is needed, is to use an organic fertilizer. Most are not water soluble until metabolized by soil organisms, which means they are less likely to wash through the soil.
    Better still would be to use compost to provide fertility. Nutrients in compost are locked up physically and chemically, waiting to be released by soil life in synch with plant uptake and growth.

Terraced field in Viet Nam

Terraced field in Viet Nam

     Phosphorus is a plant nutrient that binds tightly to soil granules, but makes its way downhill when rain washes over bare soil to move it downslope. One way to keep this nutrient out of waterways is to keep the soil covered with mulch or vegetation, especially on sloping land. Another way is to avoid exposing soil by tillage. Another way, if tillage is needed, is to till perpendicularly to the fall line of a slope. And yet another way is to alternate tilled areas with grassy strips to catch and hold soil.

Rye cover crop

Rye cover crop

    Do a lot of these recommendations — mulches, cover crops, composts, no-till — for preventing blue-green algae blooms sound familiar? Good gardening and farming practices are also good for the environment.

No-Till & Compost, and Still Problems

One of the best things about no-till gardening is not having to till. The soil of my vegetable garden hasn’t been disturbed for over 2 decades. Besides avoiding the hassle of tilling, not having to till makes for quicker and easier planting.
Today, for instance, I planned to clear a bed of harvested edamame plants to make way for lettuce. Easy! I just pulled up each plant, coaxing it along, if necessary with a Hori Hori knife so that I had the tops and only the main roots in hand. Once plants were up and out, light use of a lawn rake gathered up dropped leaves, pods, and other debris, and brought what few weeds were still present into focus for removal. In 20 minutes, I had the double row of plants in a 20 foot by 3 foot wide bed cleared, and the bed cleaned up.
“Quicker and easier” are not the only benefits of no-till. Not tilling makes for less weeds because weed

seeds, buried within every soil, don’t get exposed to light, which they need to sprout. Untilled soils also make better use of water and maintain higher levels of organic matter.

I could have sown right into the clean surface but chose, instead to further enrich the ground for the months and year ahead. A garden line and sprinklings of ground limestone re-defined the edges of the beds, along which I laid two-by-fours. The two-by-fours, only temporary, were to contain the compost which I piled into the bed to a leveled depth of about an inch.
That one inch of compost provides all the fertility the bed needs for a year of vegetable production, even with multiple crops of vegetables in the bed. In addition to fertility, the compost helps the ground hold water and air, snuffs out small weed seedlings, and sustains beneficial soil organisms for healthier plants. Because the compost is made from “garbage,” fertility derived solely from compost is truly sustainable.
———————————————
Compost, as I wrote, makes for healthier plants. Thorough bed cleanup after each crop also makes for healthier plants by reducing sources of disease inoculum. (See my new compost video, www.youtube.com/leereichfarmden, for more about my compost making.)
That’s not to say that my garden has no pest problems. A pest problem arises when you have that perfect confluence of a susceptible plant, the presence of the pest, and a suitable environment. Susceptibility of a plant depends on the type of plant as well as how well it’s been nourished. 
———————————————
All of which leads up to the admission, despite compost, pruning, and careful siting, that my tomato plants are not the picture of health. The plants, each pruned to a single stem that climbs, with the help of string ties, to a bamboo pole, have lost many of their lowermost leaves.
“Blight” is the mantra I keep hearing from other gardeners. Not so fast. Not every tomato affliction is

“blight,” a buzzword that originated, no doubt, with the “late blight” epidemic of a few years ago that sensitized gardeners and farmers to this disease. Late blight is but one of tomato’s enemies, but it’s not the only one.

Tomato plants bereft of leaves could be due to the diseases septoria leaf spot, early blight, or, of course, late blight, or the insect tomato hornworm. The hornworm is easily identified because it’s a big, fat, hungry caterpillar that chomps off big portions of healthy, green leaves. The caterpillar itself is quite a sight, as big as your thumb and with white stripes and eye-like markings along its length. Control is easy: crush them (unless they have parasites, which look like rice grains, attached to their backs) or spray using some commercial form of the biological insecticide Bacillus thuringiensis (Bt).
The three diseases are easily distinguished. Early blight marks leaves with spots of tan and black,concentric rings and yellowing leaf tissue. Septoria spots are small, round and gray, each surrounded by a single, dark margin. Late blight marks leaves with greenish-black splotches, each surrounded by a pale, greenish-yellow band. In humid weather, a downy growth develops on the undersides of leaves. On fruits, symptoms are firm, dark, greasy looking lesions.
My thorough cleanup and compost mulch greatly reduces presence of early blight and septoria leaf spot spores in the beginning of the season, as does planting tomatoes in a different location each year in a 3 year

Tomato hornworm with parasite

rotation. Late blight needs living tissue to survive winter here, so returns by wintering over in infected potato tubers, by hopscotching up from the south on favorable winds with cool, moist weather, or, as happened a few years ago, by arriving on infected transplants sold by big box stores. I grow my own tomato seedlings and hope for the best as far as cooperative weather for my plants.


Taking a closer look at my tomato leaves, I see that the main causes for their defoliation are septoria leaf spot and — uh-oh — late blight. Weather in the next few weeks will determine how fast plants decline. I could spray (some formulation containing copper) but choose to avoid even mild pesticide, in this case. Upper portions of the plants still ook fine and, most importantly, I have been eating, canning, and drying plenty of tomatoes.

THE CLOSING SCENES . . .

In the wee hours of the night of October 12th, temperatures here plummeted to 24°F, and it’s about time. Not that some garden plants wouldn’t have enjoyed a few more weeks of frost-free weather, but in the recent past, that depth of cold would typically arrive on the scene a couple of weeks or more earlier.
So I had plenty of time to prepare everything for the frigid night. Drip irrigation timers, filters, and pressure reducers are safely stowed away in the basement until next April. Frost-tender houseplants are lounging near sunny windows. The extra vents on the greenhouse have been sealed shut for winter. And the near-final cleanup is well underway.
————————————————-
Tidying up the garden is a very satisfying job, especially in a no-till garden like mine. (I detail the benefits of no-till to plants and humans in my book Weedless Gardening, whose title hints at one of those benefits.)
Take the okra bed, for instance, the ground strewn with old leaves above which rose stalky plants capped with a few leaves and an occasional flower or pod. Or the pepper bed. Yesterday it was a jumble of flopped over, old plants still coughing forth a few peppers here and there. Peeking out between the overlapping leaves of the double row of pepper plants was a row of golden beets, planted in spring before the peppers went into the ground.
We cleared the beds by digging around at the base of each plant with a hori-hori knife, a most useful tool that results from the mating of a trowel with a garden knife. With roots cut, the plant is yanked out of the soil and tossed into the garden cart for composting. The comes the finer work. Starting at one end of the bed, we pull each and every weed, roots and all, and pick up every leaf.
What’s left, then, is a smooth expanse of ground, 3 feet wide by 10 or 20 feet long, in the case of my garden beds. The pepper bed is not yet a smooth expanse. Up its center runs that row of golden orbs, each with a dark green, leafy topknot; the spring-planted beets are quite cold-hardy and can remain in place longer.
————————————————-
The thorough cleanup is for more than just aesthetics. Some pests overwinter in old plant debris. Crop rotation, that is, not planting a crop or its kin where it’s been grown for the past 3 years, is one way to move that particular crop away from next year’s potential source of the pest problem (for immobile pests). Thorough cleanup is another way. I opt for both ways.
————————————————-
Cleaning up my bed of crocosmia, a plant with sword-like leaves though which rises an arching stalk of traffic-stopping, orange-red flowers, is for tidiness and for more flowers. Crocosmia was once deemed not hardy here; it was a “summer bulb” planted in spring, flowering in late summer, then dug up a stored until the following spring.
I stopped digging it up each autumn years ago, and these days the plant flowers profusely as early as July. Global warming.
I’ve been digging up crocosmia this week because it grows — and multiplies — too well. The bulbs (actually “corms,” which are underground, thickened stems) have crowded so much that the plants are taking over a corner of the garden. Flowering has suffered. The plants grow mostly leaves.
So I’m digging up every crocosmia corm I can find for replanting somewhere new. I am sure I’ll have missed enough corms so that crocosmia will also appear again in its present location.
————————————————-
The garden looks neater every day. Quoting and agreeing with Charles Dudley Warner, writing in 1898 in My Summer in a Garden, “The closing scenes are not necessarily funereal. A garden should be got ready for winter as well as for summer. When one goes into winter-quarters he wants everything neat and trim . . . so that its last days shall not present a scene of  melancholy ruin and decay.”
————————————————-