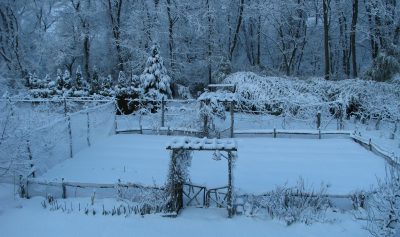
Battle for Figs: Victory

Some History

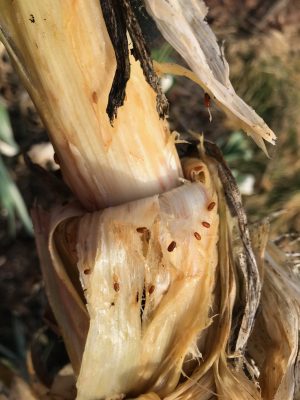
I don’t know the score over the years, but this year’s victory is mine. The battles have been with scale insects, both armored scales and their cousins, mealybugs (but rarely both in the same year), on my greenhouse fig plants.
Eating a fig
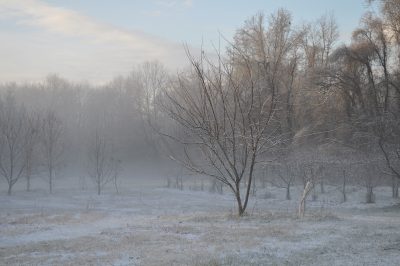
Those fig plants are planted in the ground in a minimally heated greenhouse, where winter temperatures can sink to about 35°F. The oldest of these plants have trunks 8 inches in diameter. They thrived for years without any pest problems, scale of otherwise. A few years ago, the insects made their appearance, sometimes ruining almost the whole crop.
Mealybug
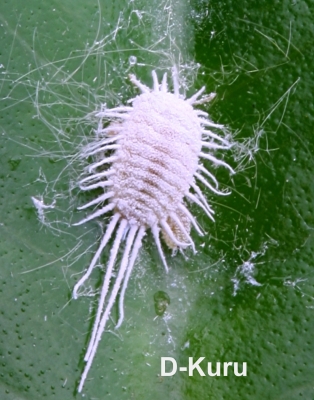
Over the years I fought them in various ways. One year it was spraying the dormant plants with alcohol. Another year it was, more aggressively, scrubbing trunks and stems of dormant plants with a toothbrush dipped in alcohol. Ants herd and protect scale insects, so another year I fenced the ants off the plants with a band of masking tape coated with forever (almost) sticky Tangletrap around the trunk of each plant.

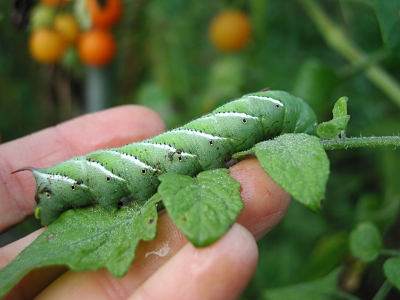
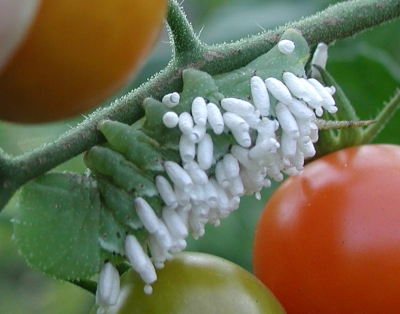
An expensive but short-lived success was the two releases of the predatory ladybird beetle Cryptolaemus montrouzieri and the parasitoid wasp Anagyrus pseudococci.
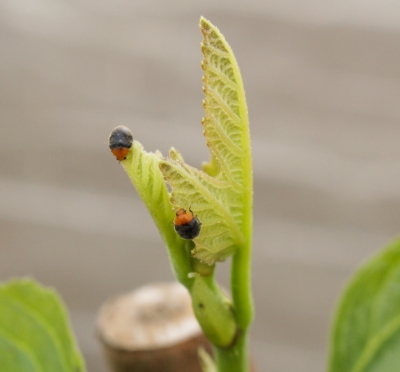
Mealybug destroyer

Mealybug destroyer

These biocontrol helpers ended up valuing each fig at about a dollar, still worth it. I screened all openings in the greenhouse, hoping to perennialize them inside. (It was not effective.)

Battle Plan, Done

So this year I tried a multipronged approach.

The biggest change was, rather than growing the figs as bushy trees, training them as espaliers. Espalier is the training of plants to an orderly, usually two-dimensional form both for beauty and, in the case of fruit plants, for good production of high quality fruit. For my figs, an additional benefit would be that each plant would only have one point of contact — its trunk — with the ground. IA band of masking tape coated with Tangletrap would be a roadblock on the ant highway. (Plus the look of the plants always elicits a “Wow” from visitors.)
Rabbi Samuel fig, espaliered in greenhouse
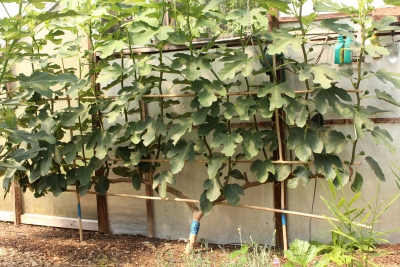
The fig plant growing near the greenhouse endwall has a short trunk that, after rising to about 18 inches from ground level, bifurcates into two, self-supporting horizontal arms extending parallel to the wall in opposite directions. At the head of each of the south beds, a fig tree is planted each of whose trunk is terminated by just a single, self-supporting, horizontal arm reaching down the bed to the sidewall. With just a trunk and one or two arms, thoroughly scrubbing down the dormant plant with alcohol is a relatively quick job. Quick enough to prevent 2 or 3 scrubbing before plants resume growth in early spring from becoming tedious.

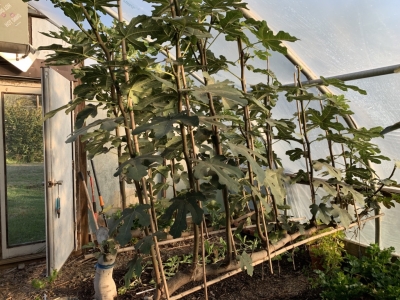
Another nice feature of this training system is that pruning the plants at the end of the season is a no-brainer. Vertical shoots that rise up from the horizontal arms are thinned to keep neighboring shoots 8 inches apart and helped along in their vertical growth by being trained to pieces of bamboo attached to the greenhouse roof. (Yes, an ant could walk up the wall and across the roof of the greenhouse and then down the bamboo to get at the plants but they are either not that smart or energetic; it hasn’t happened.)
San Piero fig
A little later in the early part of the greenhouse growing season I gave the plants some dowsings with neem oil. I’m not sure how effective the neem component is but “horticultural oil” itself is effective in fighting off scale insects.

A ring of cinnamon around the base of each plant provided further disincentive to the ants, who will not cross a cinnamon line. The cinnamon and the Tangletrap did need renewal once per season.

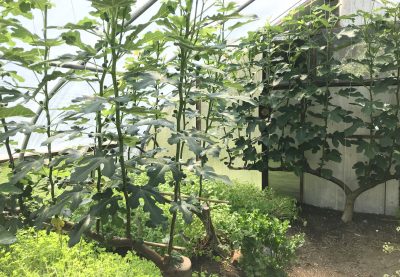
As new fig shoots soared skyward near the greenhouse roof, I used a pole pruner to prune out the top of the growing shoot. Side branches, of course, then grew, and I periodically had to to hack them back also.

Uh Oh, But All Still Good

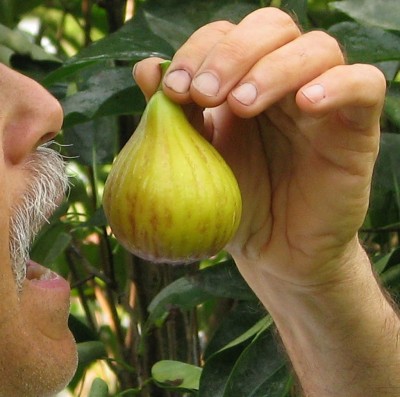
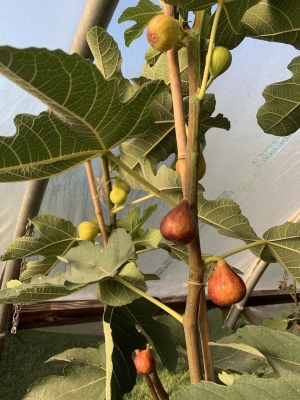
Everything was copacetic and we were harvesting figs, which formed along the vertical stems at the juncture of almost every leaf. Then, in late August I noticed some mealybugs on one plant. Time for Cryptolaemus montrouzieri again. I released them in early September and we were back in business, harvesting large handfuls of three different varieties of delciously sweet figs — San Piero, Brown Turkey, and Rabbi Samuel — daily.

And then, just today, I noticed armored scales on the plants, and a few ants! I’m not sure how the ants are getting onto the plants, but one possible “benefit” of the armored scales is hardly any mealybugs. Perhaps they can’t coexist.
Fig scale
All the measures I took against mealybugs should also be effective against the armored scales, except for the Cryptolaemus montrouzieri. Their predator Aphytis melinus, also known as the Golden Chalcid, has been effective against armored scales.

I’m not taking action. With less sunlight and cooler temperatures the figs trees have slowed down, running out of new stems on which to hang fruit. No matter; it’s been a good season of fresh figs.

Interesting and Fun

Interesting, But I Could Do Without It

Out doing stuff in the garden, I sometimes wonder: What’s fun about gardening? What’s interesting about gardening?

European hornets are interesting. My first encounter with them — large, intimidating looking hornets with fat, yellow and black striped bodies, was a few years ago when I saw it feeding on kitchen trimmings as I was about to add more to the compost pile.  
European hornet in compost pile
The thought of a sting from this brute seemed horrendous; I learned, though, that they’re not particularly aggressive and their sting belies their ferocious look. The menacing-looking brute that entered the schoolyard turned out to be a pretty nice guy.

My next significant encounter with European hornets was this week, as I was gazing up into the branches of my plum tree admiring the ripe, red plums, ready for harvest. Reaching up and picking a fruit left me in hand with hardly more than the shell of a fruit that had been eaten out from the inside via a large hole chewed on the far side. In another fruit, I saw the culprit — a European hornet — at work. Lots of plums were being destroyed, as well as near-ripe apples.
Apple being damaged by European hornet
How interesting (and unfortunate). Now, what to do. Deb immediately suggested bagging the remaining fruits. I had a stock of “Japanese fruit bags” purchased many years ago and within the hour, all remaining apples a plums were harvested, if sufficiently ripe, or bagged.
Apples in Japanese bags
As for next year, perhaps European hornets will, as in past years, no longer be troublesome. Perhaps I’ll try trapping them; a research paper showed that they were attracted to funnel traps baited with a mix of equal parts glacial acetic acid and isobutanol. I’ll watch and wait.

Interesting, and Good

Also interesting (and this time fortunate) was the activity of local squirrels this year. Squirrels are particularly fond of peaches and plums, especially early in the season when fruits are dime-size. Not ever here, though. Good. But they are also particularly fond of my hazelnuts. Left to their own devices, they will strip the plants clean.

Over the years I’ve developed a multipronged approach to keeping squirrels at bay, usually, but not always, with success. This year, the hazelnuts were totally spared. Why? Was it my deterrents?

Now that I think of it, birds also acted out of character here this year. They usually strip every fruit from the Illinois Everbearing mulberry tree and the gumi bush. (My blueberry bushes sit within the Blueberry Temple, protected by bird netting.) This year birds again got most of the mulberries but left plenty of gumis for me.

The only time birds left all the gumis and mulberries for me was the back in 2013, the summer of the 17-year cicadas.  Birds evidently relish cicadas more than my fruits. 

Compost Fun

So what is predictably fun about gardening? Yesterday’s spreading of compost, that’s what. 

The first of four beds of sweet corn had been harvested so I prepared the bed for an autumn harvest of “greens.” For starters, I chopped corn stalks off a couple of feet above ground level, then chopped them into smaller pieces in the garden cart. Digging around the base of each hill of plants was enough to sever the largest roots and allow the stalks to be tugged out of the ground and then also to the cart. I lightly raked off any remaining debris from the bed, pulled weeds, and then they went to  . . . guess where? All this was added to a bin containing a growing compost pile.

Near that bin was another bin, a “finished” bin of dark, crumbly, and sweet-smelling (well, not sweet, but pleasantly fragrant) compost. Into the cleaned out cart it went.

Back in the garden, I demarcated the edges of the old corn bed with a line of limestone and laid a metal 2 by 4 along each edge as a guide. Into the bed went enough compost for a leveled 1-inch depth. That amount of compost, in addition to smothering small weeds, letting rainfall percolate gently into the soil, maintaining moisture in the soil, and providing food and lodging for beneficial soil life, will provide all the nourishment vegetables in that bed will need for a whole year hence.
Corn bed, composted
I firmed the compost by patting it with the back of my 6-pronged pitchfork creating what I, at least, thought was a nice pattern on the surface, perhaps inspired by a photo I’ve seen of a zen monk raking the gravel garden at the Ryōan-ji monastery in Japan. Final dressing on the bed was lettuce transplants, started about a month ago and ready to pop into the compost-dressed ground.
Corn bed composted and planted

Toad in new bed

The toad liked my bed also.

Finally, I stood back and admired my work. What fun, and that bed is (to me) a thing of beauty.

Pests Pesky and Not So

Memories

The tumbled over Red Russian kale seedling brought back old memories. It was like seeing the work of an old friend — or, rather, an old enemy. It’s been so long since I’ve seen a cutworm at work in my garden that I couldn’t even get angry at it.

Cutworm and friend's broccoli

Cutworm and friend’s broccoli

I scratched around at the base of the plant to try and find the bugger. Too late, fortunately for him or her because its fate would then have been a two-finger crush. The cutworm in a friend’s garden I visited last spring was not so lucky.

The bad thing about cutworms are that they chop down young, tender seedlings. At that age, seedlings’ roots lack the energy to grow new leaves; the plants die. (I wonder how the cutworm benefits from lopping back the seedling; the felled plant usually doesn’t get eaten.)

Cutworm damage

My kale plant

The good thing about cutworms is that, in my experience, they are few and far between — just one or two every few years.

Also, on a garden scale, they’re easy to control, if needed. They prepare for their meal by wrapping their bodies around the plant stems. When I feared them more, I would cut cardboard rolls at the center of paper towels or toilet tissue into lengths of about 1-1/2 inches long, slit one site, fit it around the seedling, press it into the ground, and tape it back closed. A bit tedious, I must admit.

Then I read that cutworms can be fooled. They only attack soft, young seedlings. A thin stick or toothpick slid partway into the ground next to a seedling makes a cutworm think the plant is a woody plant and, hence, out of its league. Since I didn’t find the culprit in my garden, I slid thin sticks next to nearby seedlings. For my friend’s garden, I returned from her kitchen with a handful of toothpicks and instructed her teenage son what to do with them.
Cutworm protection with stick
Except for today, I haven’t taken precautionary measures against cutworms for many years. Especially every morning, robins, catbirds, and mourning doves are pecking around the ground in my garden; I suspect that’s one explanation for the lack of cutworms.

A Good Parasite

A week or so ago, I saw another old “friend” in the vegetable garden. I noticed that leaflets had been thoroughly stripped from one region of one tomato plant. Obviously, a tomato hornworm, a voracious and rapid diner, was lurking somewhere amongst the existing foliage. A cause for panic? No!

The culprit, a green, velvety caterpillar with widely spaced, thin white stripes and some rows of black dots, is undoubtedly intimidating.
Tomato hornworm
Besides its voracious appetite — you can hear it chomping away — it is the size of an adult pinky.

Still, not to worry. Like cutworms, tomato hornworms turn up in my garden only every few years. And again, like hornworms, they seem to arrive, or show evidence, solo.

I did not reach out to crush the hornworm when I saw her because her back was riddled with what looked like grains of white rice standing on end. Those “rice kernels” are actually the eggs of a parasite that in short order turns that beautiful body to an ugly mush. It’s a dog eat dog world out there.
Parasitized hornworm

A Call for Action with This One

I can’t be so complacent about all pests that can turn up in my vegetable garden. Probably the worst one that causes problems every year is one or more of the caterpillars now, as I write, chewing away on the leaves of cabbage and its kin. The symptoms are quite evident: holy . . .  whoops, holey . . . leaves upon which is deposited dark green caterpillar poop.
Cabbageworm damage
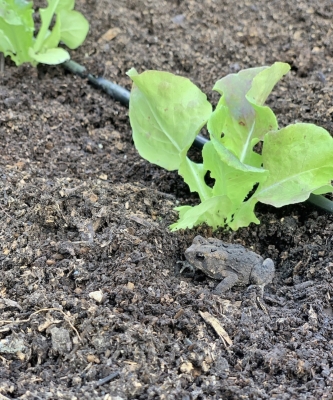
A close eye is needed on cabbage and its kin because one day there’ll be no damage and next time you look, leaves are riddled with holes and poop.

And then, action is necessary. Hand-picking is one option. I choose to use the biological insecticide B.t., short for Bacillus thurengiensis and commonly sold under such names a Dipel or Thuricide. It should be used with restraint because the insects can — and, in some cases, have — developed resistance to this useful pesticide which is very specific in what it harms and what it leaves alone.

Now that I mention it, excuse me for 10 minutes while I mix up a batch of spray for my cabbages, Brussels sprouts, and kale plants . . .

I’m back. The caterpillars seem to prefer cabbage, Brussels sprouts, and cauliflower over kale, which is fine with me because kale is my favorite of the lot.

Many predators, including certain wasps and beetles, diseases, birds, and bats, keep these caterpillar pests under control. Evidently not enough, though, in my garden.

Inside and Outside

Houseplant Envy

I wonder why my houseplants look so unattractive, at least compared to some other people’s houseplants. I was recently awed by the lushness and beauty of a friend’s orchid cactii, begonias, and ferns. I also grow orchid cactii and ferns, so what’s with mine?Houseplants at bedroom window

Perhaps the difference is that other’s houseplants have a cozy, overgrown look. Mine don’t. Most of my houseplants get repotted and pruned, as needed, for best growth. Every year, every two years at most, they get tipped out of their pots, their roots hacked back, then put back into their pots with new potting soil packed around their roots. In anticipation of lush growth, stems also get pruned to keep the plants from growing topheavy.

Rather than being scattered willy-nilly throughout the house or clustered cozily in corners, as in friends’ homes, my houseplants get carefully sited. For best growth, plants, especially flowering and fruiting plants, need abundant light, something that’s at a premium this time of year. So my houseplants huddle near south-facing windows like baby chicks near a heat lamp. And then in summer, when light, even indoors, becomes more adequate and the plants could move a bit back from the windows, I move them all outside so that summer sunlight, rain, and breezes can really get them growing.

What can I say? I’m too focussed on good growth, and that’s not necessarily what makes for the prettiest houseplant. It’s the difference between a lush plant packed into and overflowing its pot, along with elbow to elbow neighbors, versus one that’s had its soil refreshed frequently, its stems thinned out and pruned back, always with younger stems raring to grow. I can’t help myself.Houseplants, office window

Choice of houseplants also comes into play. Houseplants that are prettiest for the longest period of time — and need less light — are those valued for the shapes and colors of their leaves. I gravitate to houseplants with fragrant flowers or fruits, or — even better — fragrant flowers and fruits. Pumping out lots of flowers and, especially, fruits demands much more energy from a plant than just growing leaves. And that energy comes from sunlight and young leaves that are efficient at working with that light. Hence the repotting and clustering near sunny windows of my houseplants.Houseplants at living room window

Perhaps it’s also a matter of the “grass is greener,” to me, in someone else’s house. I’ll start looking at my houseplants more with the eye of an appreciative visitor.

Winter Cold: The Good and the Bad

The temperature was 9° and we were on our way to go cross-country skiing when a friend asked if there was any benefit to the cold weather. Plantwise, that is. We knew the weather was good for skiing. Interesting question, and the answer is “yes.”Vegetable garden in winter

The first benefit that comes to mind is the effect of cold on diseases, certain diseases, at least. The cold kills them. Peach leaf curl, for instance, is a disease that overwinters in peach buds, resulting in leaves that unfold thickened and twisted and eventually yellow and fall so fruiting and growth suffer. Except in cold winters. My winters are usually cold enough so this disease is rarely a problem.

A number of summers ago late blight disease of tomato went on the rampage here and throughout the Northeast. That disease can’t spend the winter this far north because it’s too cold. In that past summer and some other summers, the disease hitchhikes north on infected plants brought here or, when winds and humidity are just right, hopscotches along north from one infected field to the next.

Insect pests that overwinter in the soil are more damaged the colder the soil gets, and bare soil gets colder than mulched soil, all of which highlights the balancing acts necessary in gardening.

Pests notwithstanding, bare ground isn’t good for plants and soil. Plant roots are more likely to be damaged by the increased exposure and, especially evergreens, are more apt to dry out because more water will evaporate from bare ground and because roots have a hard time drinking in water from frozen ground. Bare ground is also subject to erosion and nitrogen loss.

On the other side of the coin, bare soil goes through more cycles of freezing and thawing, which breaks up and moves around soil particles, in effect tilling the soil. Back to the previous side of the coin, that freezing and thawing can move soil around enough to heave plants, especially small or newly rooted plants, up and out of the ground.

So, I like cold weather for my plants. But I mulch heavily. And I especially like it, as do the plants — and, admittedly, some pests — when there’s an additional blanket of snow over the ground. It also makes for good skiing.South field, winter view

Dry, Wet, Bad, Good?

Some Bad

Wow! What a gardening year this has been. Looking back on 2018, it’s been the oddest year ever in terms of weather, insects, and disease.

After starting off the season parched, seemingly ready to go into drought, the weather in July did an about face. The rains began. Average precipitation here in the Northeast is about 4 inches per month. July ended up with about 6 inches, August saw 5 inches, September 8 inches(!), October 5 inches, and November 8 inches(!!).

All that rainfall brought humidity, which might have been responsible for my celeriac plants hardly growing, then rotting.

Celeriac in new home

Celeriac, early in the growing season, before the rains

(Perhaps not, because this was my third growing season of failure with celeriac.) I’m taking this as a celeriac challenge. Perhaps next year I’ll try them in a large tub where I can have more control over soil composition and moisture.

The humidity also had too many figs morph into fuzzy, gray balls as they softened and sweetened.

Tomatoes this year tasted very good, as usual, but yield was way down and too many showed some rotting areas. (In my experience, growing tomatoes under variable soil and weather at various locations around the country, their flavor is mostly a matter of genetics; a good variety tastes good everywhere.) Particularly irking was anthracnose disease, which often isn’t noticeable when fruits are harvested, but quickly shows up as round, sunken areas.

Onions suffered this season. Mostly they were stunted, and I’m not sure why.

Zucchini was a bust because the plants petered out from powdery mildew and vine borers just after midsummer. I usually circumvent these common problems with multiple plantings, starting new zucchini plants in early summer to replace the decrepit ones. I forgot to replant this summer (probably because I don’t like zucchini all that much anyway).

Medlar is an uncommon, very old-fashioned fruit that I’ve grown for many years. Although it’s gotten a bad rap for it’s ugly — to some people — appearance, the flavor is delicious, the soft flesh creamy smooth like apple butter with a similar flavor livened with vinous overtones. Medlar fruit in hand
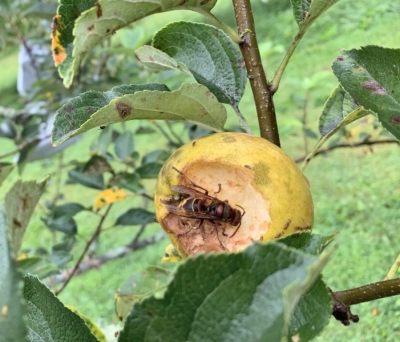
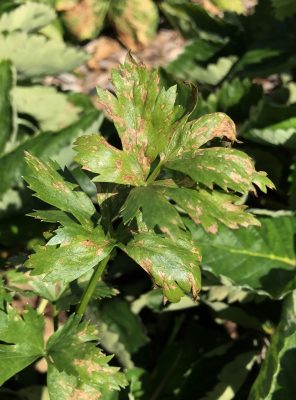
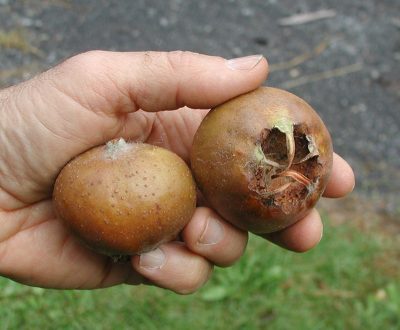
Usually the plant is pest-free but a few years ago something, perhaps a fungus, perhaps an insect, started attacking it, leaving the flesh dry and crumbly. I have yet to identify the culprit so that appropriate action can be taken.Medlar pest damage

Some Good

Not that this past growing season was bad. I won the battle against soft scale insects (mealybugs) on my greenhouse figs, although their ecological niche was filled by just-as-bad armored scale insects. A close eye and an occasional spray of Neem oil kept flea beetles at bay from eggplants.

A couple of the same Neem sprays beginning in mid-September may have kept a new pest in the area, Allium leafminer (ALM, Phytomyza gymnostoma) at bay. Last year each of my near perfect-looking leeks revealed a rotted stalk as I lifted them out of the ground.

Allium leafminer

Allium leafminer

Then again, I did plant this past season’s leeks far from where the previous season’s leeks grew. Then again, the ALM flies can fly. Then again, maybe they weren’t here this year; perhaps the weather was not to their liking.

Nice leeks

This past season’s leeks

There was also no sign this past season of the white flies that decimated my kale the previous season.

Spotted wing drosophila (SWD), a species of fruit fly that has invaded the country relatively recently, did mostly ruin autumn ripening yellow and black raspberries. But little damage was suffered by my favorite (and perennially most successful) fruit, blueberries, probably thanks to some experimental traps developed by Peter Jentsch of Cornell University.

SWD trap

SWD trap

Peppers were even more of a success than usual, mostly due to my staking the plants. The only fault of Sweet Italia, my favorite variety for its early ripening, for its flavor, and for its good yields, is that the fruit-laden plants flop over under their own weight. Eventually, the small bamboo stakes I used proved only partially adequate; next year they’ll get the stakes they deserve.

I treated a few beds in spring to a relatively new method for weed control: tarping. Laying a sunlight-blocking tarp down on the ground for a couple of weeks or more in spring warms the soil beneath, stimulating germination of any weed seeds lurking there. The sprouting seeds are disappointed by the incessant darkness. They die. Timing, temperature, sunlight, and duration of tarping all play a role in this techniques effectiveness.

(Tarping is very different from using black plastic mulches. The latter are kept in place all season long, with garden plants growing in holes or slits in the plastic. Soil beneath the plastic can suffer from lack of air or, if not drip irrigated, lack of water. Also, the tarp — mine came from www.billboardtarps.com — can be folded up and re-used for many seasons.)

And finally, we were happy to find some assassin bugs and anchor stink bugs, Stiretrus anchorago, in the garden. Both are beneficial insects — yes even that particular stink bug.

Immature beneficial stink bug

Immature beneficial stink bug

Good Overall

All in all, it was a good season — as always. The secret is to grow many different kinds of plants. No season, no matter what the weather or pests, has ever been bad for all plants.


Of Worms and Leaves, Here and Beyond

Unreiking is Good Exercise

For the past few days I’ve been engaged in the esoteric exercise of unreiking. Basically, this involves lifting heavy (or sometimes light) sacks, slitting them with a knife, and then moving my arms back and forth over the spilled contents. Okay, okay, the “sacks” are plastic bags, their contents are autumn leaves, and I’m holding a pitchfork in my hands as I spread out the spilled leaves.

Leaf bags with pawpaws

Sammy is looking forward to this leafy mattress

(Unreiking is the reverse of another esoteric exercise, reiking, whereby  . . .  well, leaves are raked up into plastic bags.)

Some people have too many leaves or otherwise don’t want them around. I have too few leaves and have use for them. By unreiking, the leaves get spread beneath my berry bushes, grape vines, and pear trees. These leaves feed bacteria, fungi, and other soil microbes, which slowly rot down the leaves to enrich the ground with nutrients and add organic matter that helps the soil hold both moisture and air.

Sammy also likes the mulch

Ahhhhhh

After doing this autumn after autumn for many years, the ground beneath these plants is as good as any agriculture soil in the world.

A Gardener’s, Farmdener’s, and Farmer’s Friend, Reconsidered

Our forest soils are similarly enriched, though to a lesser degree, with each autumn’s leaf drop. But change is under way, and the culprit is the earthworm.

Backtrack to about 12,000 years ago; that’s when the last glacier receded from the northern parts of the U.S. The glacier froze, compacted, churned and moved soil everywhere north of New Jersey, the upper parts of Pennsylvania, Ohio, Indiana, and Illinois, and parts of Wisconsin and South Dakota. Most of North Dakota was also enveloped by the the glacier, as well as, moving further west, the northern parts of the northern most states. In so doing, it killed off any native earthworms.

The still existing native earthworms to the south could have migrated back up here, but they move very slowly. Earthworms’ top speed is estimated at less than 6 yards per year.

Here, north of that line of glaciation, you and I do see earthworms in our soil. They’re not native; they arrived here nestled within pots of soil and organic debris, and as discarded soil ballast in ships, beginning in about the 17th century, with European colonists. And they liked it here.

More recently, those European immigrants — the worms, that is — were joined by worms from Asia.

Both species of non-native earthworms continue to spread in the soil of potted plants, in compost and leaf mulches, in home composting kits, and in discarded fishing bait (“nightcrawlers”).

Problem is that a few species of these non-native earthworms are very good a decomposing the leafy mulch that blankets forest floors. The blueberry, mountain laurel, rhododendron and other shrubs and ground covers in our forests thrive in that leafy mulch. The action of these non-native earthworms threatens to change the character of our forests.

Eek, A Snake Worm!

A number of years ago, my friend Sandy told me of strange happenings in her garden, of the abundance of worms and worm castings to the extent that the soil became so loose that her plants were flopping over. I pooh-poohed this report until a bit of research revealed this invasive worm issue.

I couldn’t offer Sandy any advice on what to do and, in fact, there’s no recommended way to deal with invasive worms. Discarding fishing bait at the end of a fishing day is one way these worms spread. (Sandy’s husband does fish.) They also can be spread in potted plants and in composts that were insufficiently heated and in mulches. (Uh oh; what about all my leaf hauling?)

For all the compost I make and spread, and all the leaves and other organic materials I haul here to the farmden, I come upon surprisingly few worms. One did catch my eye the other day, something about the way it moved and its robustness.

A crazy snake worm

Crazy snake worm?

Could it be the European Lumbricus terrestris? Could it be the Asian “crazy snake worm”(probably Amynthas agrestis or A. tokioensis). Judging from the crazy way it moved and the pale collar (clitellum) circling its body completely, I’m guessing it’s one of the crazy snake worms.

Earthworms have always been a friend of gardener and farmer. Charles Darwin was a notable champion of them. After spending a lot of time on his belly in observation of these creatures, he wrote up his observations in a book, The Formation of Vegetable Mould through the Action of Worms. Darwin calculated that earthworms (probably Lumbricus terrestris) brought 18 tons of nutrient-rich castings to the surface per acre per year, in so doing tilling and aerating the soil while rendering nutrients more accessible for plant use. He wrote that “worms played a more important role in the history of the world than most persons would at first suppose.”

In our forests, European and Asian earthworms can eliminate leaf litter and change the soil composition to create conditions that favor non-native plants, decrease native plant biodiversity, and result in less understory vegetation. To the gardener and farmer, earthworms are a friend.

Shaving and Composting

 . . . But My Garden is in Order

“Some men there are who never shave (if they are so absurd as ever to shave), except when they go abroad, and who do not take care to wear polished boots in the bosoms of their families. I like a man who shaves (next to one who doesn’t shave) to satisfy his own conscience, and not for display, and who dresses as neatly at home as he does anywhere. Such a man will be likely to put his garden in complete order before the snow comes, so that its last days shall not present a scene of melancholy ruin and decay.” So wrote Charles Dudley Warner in his wonderful little book (much more than a gardening book) My Summer in a Garden (1898). I gave up shaving a few months ago, but I am putting my garden in order for autumn.

The scene is quite pretty as I look out my upstairs bedroom window upon my garden — my vegetable garden — each morning. Garden view, autumn
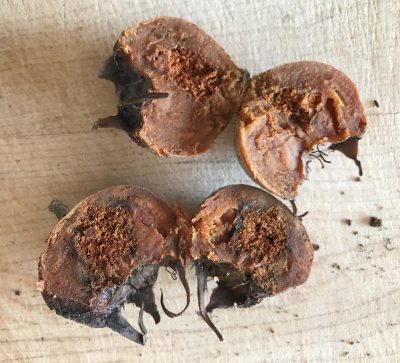
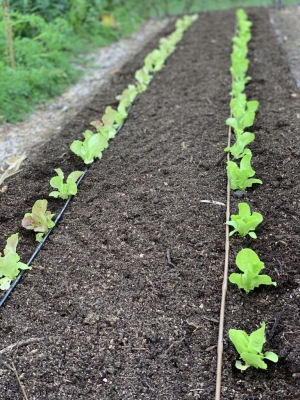
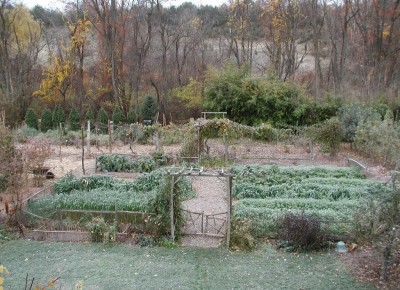
Weeds have been removed from the paths and the beds, and spent plants have been cleared away. What remains of crops is a bed with some tall stalks of kale that were planted back in spring. Yet another bed is home to various varieties of lettuce interplanted with endive, all of which went in as transplants after an early crop of green beans had been cleared and the bed was weeded, then covered with an inch depth of compost. Also still lush green is a bed previously home to edamame, which was subsequently weeded, composted, and then seeded with turnips and winter radishes back in August.

From my window, the remaining eight beds in the garden present mostly grasses in various states of lushness. The “grass” in this case is oats, sown in any bed no longer needed for vegetables at the end of this season. I had cleared such beds of spent plants and weeds, sprinkled oat seeds (whole “feed oats” from Agway), watered, and then, as with the other beds, covered them with an inch depth of compost. One bed was finished for the season except for six floppy cabbage plants. I staked those plants up tall and out of the way, and then gave the bed the same treatment around the cabbages’ ankles.Cover crop, 3 beds with cabbage

Ready for Spring

That’s it: It all looks fresh, green, and neat — but more than that, what I did is also good for next year’s garden. Cleaning up weeds this year makes for less self-seeding of annual weeds and seeding and establishment of perennial weeds. Cleaning up spent plants takes any pest-ridden plant parts off-site, reducing chances for future pest problems.

Dense growth of oats protects the soil surface from pounding rain so water percolates in rather than skittles off the surface, promoting erosion. Cover crops, 2 beds
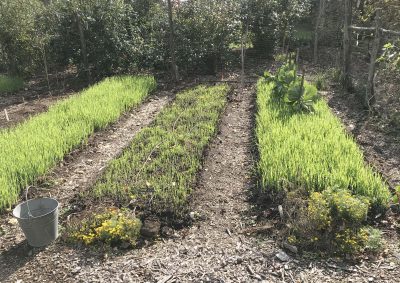
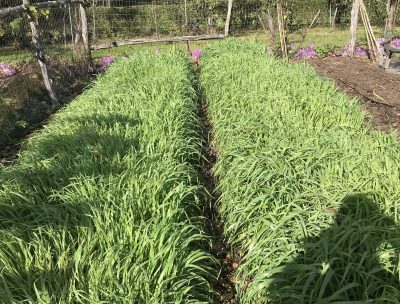
Below ground, oat roots pull up nutrients that rain and snow might otherwise leach away into the groundwater.

And finally, that inch depth of compost that each bed gets helps support the many beneficial fungi, bacteria, actinomycetes, and other soil microorganisms that make up the soil food web. In so doing, it will provide ALL the nutrition my vegetable plants, even intensively planted vegetables, need until this time next year.

Mr. Warner, I think, would approve. Even my non-shaving; I do trim my beard regularly.

Add Water, Conveniently

A lot of compost is needed to cover all those vegetable beds. For all the beds in my two vegetable gardens, as well as those in my greenhouse, I estimate my annual needs at almost 5 cubic yards per year.

My compost is made from hay I scythe from my small field, kitchen scraps, spent vegetable plants and weeds from my garden, some horse manure in wood shavings, and, for fun, old cotton or woolen clothing, and leather gloves and shoes. 

Yes, I’ve read about striking a balance between feedstuffs high in carbon and those high in nitrogen in order to get a compost pile chugging along. As important is good aeration and moisture. Most compost piles that I see suffer from thirst.

A lot of water is required to wet the inner layers of a compost pile, and applying it requires more patience than I have. So I no longer do it manually.

I purchased a small sprinkler which I connected with 1/2” black plastic tubing (the same as I use for drip irrigation mainlines) along with some L connectors to lead the water line from the top center of a pile neatly down to ground level. Water pressure is variable from my well so I also put a pressure reducer, to 15 psi, in the line; a valve needing just one-time adjustment keeps the sprinkler wetting only the top of the pile. A U-shaped metal pin keeps the sprinkler firmly in place in the center of the pile.Compost sprinkler

All that’s needed after adding a batch of material to the pile is to set up the sprinkler, turn on the spigot, and set a timer for about 20 minutes. The droplets cover the pile right to the edges and in a day or two temperatures soar to 140° or more.

Next year at this time, this year’s piles will be ready to do their part in putting my garden neat and in order.

Some You Win, Some You Lose. Why?

Mo’ Better Berries

Because I’ve grown a number of varieties of blueberries for a long time, I’m often asked what variety I would recommend planting. Or whether you need to plant two varieties for cross-pollination in order to get fruit.

The answers to both questions are intertwined. First of all, blueberries are partially self-fertile so one variety will bear fruit all by itself.
Large blueberries
But — and this is important — berries will be both more plentiful and larger if two different varieties cross-pollinate each other. (Apples, in contrast, are self-sterile so, with few exceptions, won’t bear any fruit at all without cross-pollination.)

Benefits of cross-pollination aside, why plant just one variety of blueberry? Different varieties ripen their fruits at different times during the blueberry harvest season. With a good selection of varieties, that season can be very long.

Here on the farmden, the season opens with Duke and Earliblue, both usually ready for picking (in Zone 5) at the end of June. The season moves on, with Blueray, Berkeley, and Bluecrop ripening in July, and Jersey, Toro, and Nelson in August.Blueberries galore 
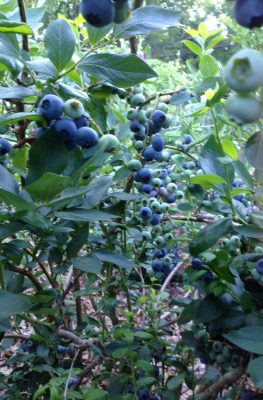
As I write, in September, the variety Elliot is still bearing ripe berries.

So if you’re going to plant blueberries, which I highly recommend doing, plant more than one variety, and choose the varieties that let you enjoy berries with your morning cereal or your after dinner ice cream over a long season.

Soil Matters

I pay special attention to the soil when I plant blueberries, and it pays off. Blueberries have rather unique soil requirements among cultivated plants, demanding those that are very acidic, high in organic matter, low in nutrients, and consistently moist and well-aerated. (Most cultivated plants like soils that are only slightly acidic and have moderate to high fertility.) No matter if a soil is not naturally to blueberry’s liking; it can be made so.

The soil where I planted my blueberries drains well. If it did not, I would either choose a better location or else create mounds on which to plant.

Next in importance is soil acidity; I test it before planting. If it’s not at the required pH of 4 to 5.5, I spread pelletized sulfur, a naturally mined mineral, over the ground. (Pelletizing the sulfur makes it less dusty to work with.) Mulched blueberry planting
The amount of sulfur, per 100 square feet, needed to lower the pH by one unit would be a pound in a sandy soil and three pounds in a clay soil. My clay loam’s initial pH was about 6.5, so I needed 3 pounds of sulfur per hundred square feet to lower that pH to 5.5, that upper limit enjoyed by blueberries.

Now, for planting. I mix a bucketful of peat moss with the soil in each planting hole and then tuck the plants and soil into the hole, setting the plants slightly deeper than they stood in the nursery. Peat moss is a long-lasting source of organic matter, unique among organic matters in also being low in nutrients.

Right after planting, I spread a 2 to 3 inch depth of some weed-free, fluffy organic material, such as wood shavings, wood chips, straw, pine needles, or autumn leaves, as mulch. The mulch snuffs out weeds, which are more adept than blueberry at soaking up water and nutrients, and keeps the soil cool and moist, just as it is in blueberry’s natural habitats.

With regular watering, as needed, pruning, and annual mulching and attention to soil acidity, blueberry leaves should maintain a healthy, green color, and stems should grow a couple of feet or so each year. My planting of 16 plants yields almost 200 quarts per year of delicious, organic blueberries.

Celeriac Failure, Again

Blueberries have been a great success; now for a failure. Celeriac, a celery relative that puts that flavor  into its softball-sized, white root, isn’t well-known as a vegetable, but I’d like to grow it. I’ve tried, for the past couple of years, without success. The problem is some sort of celery blight that kills the top growth so there’s no greenery to feed the root.

Both early blight and late blight, fungal diseases, could cause problems. They arrived in gardens on infected celery seed and/or infected celery debris from the previous cropping season. Celery bacterial blightLast fall I thoroughly cleaned up diseased plants, even planted some celeriac this year in the greenhouse. Failure occurred both outdoors and in the greenhouse, although lots of rain and heat could have helped (the fungi or bacteria, not me).

I’m not giving up. Perhaps the seed is the problem. Seed can harbor the disease, but can be “cleaned” up with a heat treatment: 30 minutes at 118°F. As a last resort, I could spray an organic fungicide such as one of the organically approved materials based on copper or hydrogen peroxide. Perhaps this time next year I’ll be eating celeriac.

Figs and Peppers and . . .

Fig Frustrations and Joys

Over the years I’ve shared the joys and frustrations of growing figs in my minimally heated greenhouse. The joys, of course, have been in sinking my teeth into fruits of the various varieties. Also, more recently, the neat appearance of the plants which are trained as espaliers. Fig espalier
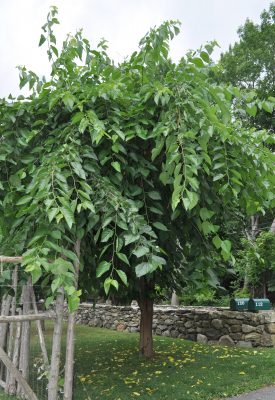
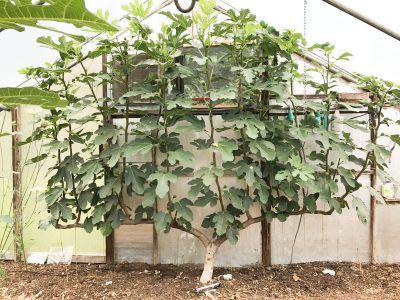
Left to its own devices, a fig can grow into a tangled mess. In part, that’s because fig trees can’t decide if they want to be small trees, with single or a few trunks, or large shrubs, with sprouts and side branches popping out all over the place.

A major frustration in my greenhouse fig journey has been insects, both scale insects and mealybugs. These pests never attack my potted figs which summer outdoors and winter indoors in my barely heated basement. In the greenhouse the problem each year became more and more severe, eventually rendering many of the ripe fruits inedible.More fig espaliers All that despite my attempts at control by going over plants with a toothbrush dipped in alcohol, oil sprays, and sticky barriers to keep ants, which “farm” these pests, from climbing up the trunks.

Scale and mealybugs are hard to control, let alone eradicate. Yet I am now secure enough in my victory to have claimed success in the battle.

Success began last year, when research pointed me to two predators of these pests, Chrysoperla rufilabris and Cryptolaemus montrouzieri, both of which I ordered online and released into the greenhouse. They were expensive, bringing the cost of my fresh figs to about one dollar each. Still worth it, though.

I got to thinking, “Perhaps I could perennialize these predators in the greenhouse so that additional annual purchases would be unnecessary.” As a first step to creating a home (or a jail, depending on your perspective) for them, I covered all greenhouse openings to the outdoors with window screening. These predators also like moisture, so I periodically spritzed the greenhouse and laid some absorbent wads of paper here and there on the branches.


I further thought, “How does the greenhouse environment differ from the great outdoors, where my figs are pest-free?” Rainfall! Although the greenhouse environment is humid, water never falls on the plants’ leaves and stems. So rather than period spritzing, almost every day since early spring I have blasted leaves, stems, and developing fruits with water.

The result: I haven’t seen one mealybug or scale insect all season!

Success, Who Knows Why?

I have to restrain myself from the usual gardener’s hubris in thinking that what I did cured the problem. Perhaps the “rainfall” favored the predators, of which there’s been nary a sign, by knocking the pest insects off the plant, or by creating a moist environment inimical to the pests, or . . .  Perhaps my screening the greenhouse cured the problem. Perhaps the pest problem disappeared for none of these reasons. Or from some combination of these reasons.

If I had a full-blown experimental station and was willing to sacrifice some fresh figs to science, I could possible sleuth out the answer with control plants to what happened. But I don’t, so I’ll just keep enjoying and be thankful for the fresh figs — and keep a close eye on what’s going on.

Dondé Está la Salsa?

I have a lot of faith in natural systems (aka Mother Nature), but sometimes she gets things mixed up. Case in point relates to peppers. The pepper crop this year is excellent, mostly because I staked each plant, weeded well, and grew varieties that do well here (Escamillo, Carmen, Perperoncini, and, best of all for flavor and production, Sweet Italia). 

What can be done with excess peppers? Salsa, of course. 

But a key ingredient for salsa is cilantro, which enjoys cool weather both for germination and growth. Self-seeded cilantro plants were sprouting and growing all over the place a few months ago. The dried stems topped by BB-sized seeds is all that remains of them. Cilantro seedsThose seeds will drop and germinate in the cooler temperature a few weeks hence. But I need cilantro now.

With foresight, I could have collected and sown these seeds a few weeks ago. The plants would have bolted (put energy into flowers rather than leaves) rather quickly but repeated sowings would have kept me in fresh new plants.

Belatedly, I have sown those seeds. To speed germination, I soaked them, then planted them in seed flats I kept in the refrigerator for a day and then moved to a cool, shaded area. Optimum temperatures for germination and growing of cilantro is 50-85° F. As I write, the temperature is in the mid-90s.
 

Fig Redux, One Week Later, A Bummer

Yes, mealybugs are still not to be seen. But now I see closely related scale insects. And plenty of them. Fig scaleSo I started the water sprays again, which have the potential problem of creating so much humidity and moisture that ripening figs rot. On the other hand, it might set back the scale, perhaps by knocking off ants, who “farm” scale. I also ordered a new predator, one for scale, Aphytis melinus.
 

Mulberries and an (a?) Herb

Mulberries, Still

I finally am getting to eat some ripe mulberries this year, and they were — and are — very, very good. The wait wasn’t because the tree was too young. And anyway, mulberries are very quick to bear fruit, often the year after planting. 

I got to eat fruit from my tree this year because resident birds have been kind enough to share some with me. Of course, it was not really kindness on their part. Illinois Everbearing mulberry fruit
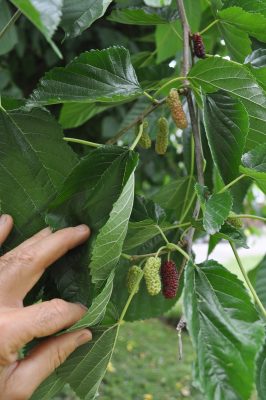
Birds also eat fruit for their juiciness, and the past weeks and weeks of abundant rainfall probably satisfied some of that need. The only other year I had plenty of mulberries — much more than this year — was a few years ago when 17-year cicadas descended upon here. All summer I awoke to their grating cacophony, but did feast on mulberries as birds feasted on the cicadas.

You might think it late in the season for mulberry fruits, which started ripening back in early July, to still be ripening. The variety name of my tree says it all: Illinois Everbearing. Not only is this variety everbearing, but it also has a very fine flavor, much better than the run-of-the-mill and ubiquitous wild mulberries whose fruit is usually too cloying. Illinois Everbearing’s sweetness is balanced with a bit of refreshing tartness.

Good as it is, Illinois Everbearing’s fruits cannot compare with that of black mulberry. The “black” refers to the species, Morus nigra. Illinois Everbearing is a hybrid of our native red mulberry, M. rubra, and white mulberry, M. alba, an Asian species that was introduced into our country about 200 years ago, liked it here, and mated with the native species. Black mulberry can only be grown in Mediterranean climates, so mine, in a large pot, bears only a handful of berries each year.

Some people contend that black mulberries adaptability is more widespread than mild winter climates. I have my doubts but I am going to graft a branch from my little tree onto some stems of some wild mulberries and see what happens. (The wild mulberries might either be white or red mulberries, or natural hybrids of the two; the color designations have nothing to do with the color of fruit a tree bears.)Illinois Everbearing tree

I’m happy enough with the long season, good flavor, and occasional harvest of Illinois Everbearing. Plus, it’s a pretty tree, and large, so the branches are now beyond reach of deer, who love to eat mulberry leaves.

I devote a whole chapter to mulberries, white, red, and black, in my book Uncommon Fruits for Every Garden.

Basil, Uh Oh

Bringing my eyes down from the dark mulberries to ground level, and walking over to the vegetable garden, I take a close look at this year’s basil. Hmm. Very slight yellowing of some of the leaves. Could it be  . . . ? Yes, turning over one of those slightly chlorotic leaves I see tell-tale purplish brown spores, indicating downy mildew disease.Basil downy mildew, lf upper

A relative newcomer to the garden scene, basil downy mildew (a different pathogen than cucumber downy mildew, grape downy mildew, etc.) arrived on the East Coast in 2007, made it to the West Coast by 2009, and to Hawaii by 2011. It hitchhike around on infected seed, infected plants, and infected leaves.

Basil downy mildew, leaf underside

Basil downy mildew, leaf underside

Some organic fungicides are allowed for controlling the scourge, but my basil mingles so intimately with other plants in the vegetable garden that I don’t consider that an option. Fortunately, other controls are feasible.

One thing would be to not mingle my basil so intimately with other plants. Sunlight is one nemesis of the mildew, as with most fungi. Better air circulation would also lower the humidity around the plants and speed drying of the foliage, also not to the liking of the mildew fungi.

Going one step further, Dr. Meg McGrath of Cornell University suggests growing basil in pots. Plants can be whisked under cover on cool nights, when dew threatens, or during rain or cloudy conditions.

Starting off with clean seed or plants would also limit infection. Not totally, though. Although the fungus does not overwinter in cold regions, given good (for the fungus) conditions, it can hitchhike up here over hundreds of miles.

Breeders are hard at work developing resistant varieties of basil, with some success. Among the resistant varieties are Amazel (shouldn’t the name be Amasil or Amazil?), Eleanor, Emma, Everleaf (Basil Pesto Party), Devotion, Obsession, and Thunderstruck. I’m growing Amazel and Everleaf this year. No sign of mildew on Amazel. Everleaf, this year, at least, has it as bad as my standard varieties.

None of the resistant mentioned varieties are immune to basil downy mildew, just resistant. So it pays to also give the plants a lot of sunlight and good air circulation, and consider pitted plants, for their mobility.

And Some Entomo . . . No, Etymology

Fun herb fact: The word “herb” was borrowed from the old French word erbe, which is why we don’t — and the British didn’t, initially — pronounce the h. Scribes in the 15th century, influenced by their knowledge of Latin, started using the Latin word herba. But still, no one spoke the h. Fast forward to the mid-19th-century and, all of a sudden, dropping h’s became a marker of low social class among the Brits, so they dropped them.